Connect to UIlicious Grid
You can connect to the UIlicious Testing Grid directly and remotely execute test scripts written with browser automation libraries that uses the WebDriver Protocol, such as:
The UIlicious Testing Grid supports all Webdriver Protocol endpoints, and legacy JSON Wire Protocol endpoints.
Step 1: Get webdriver connection URL
You will need the UIlicious Webdriver Connection URL in order to configure your test to connect to the UIlicious Testing Grid.
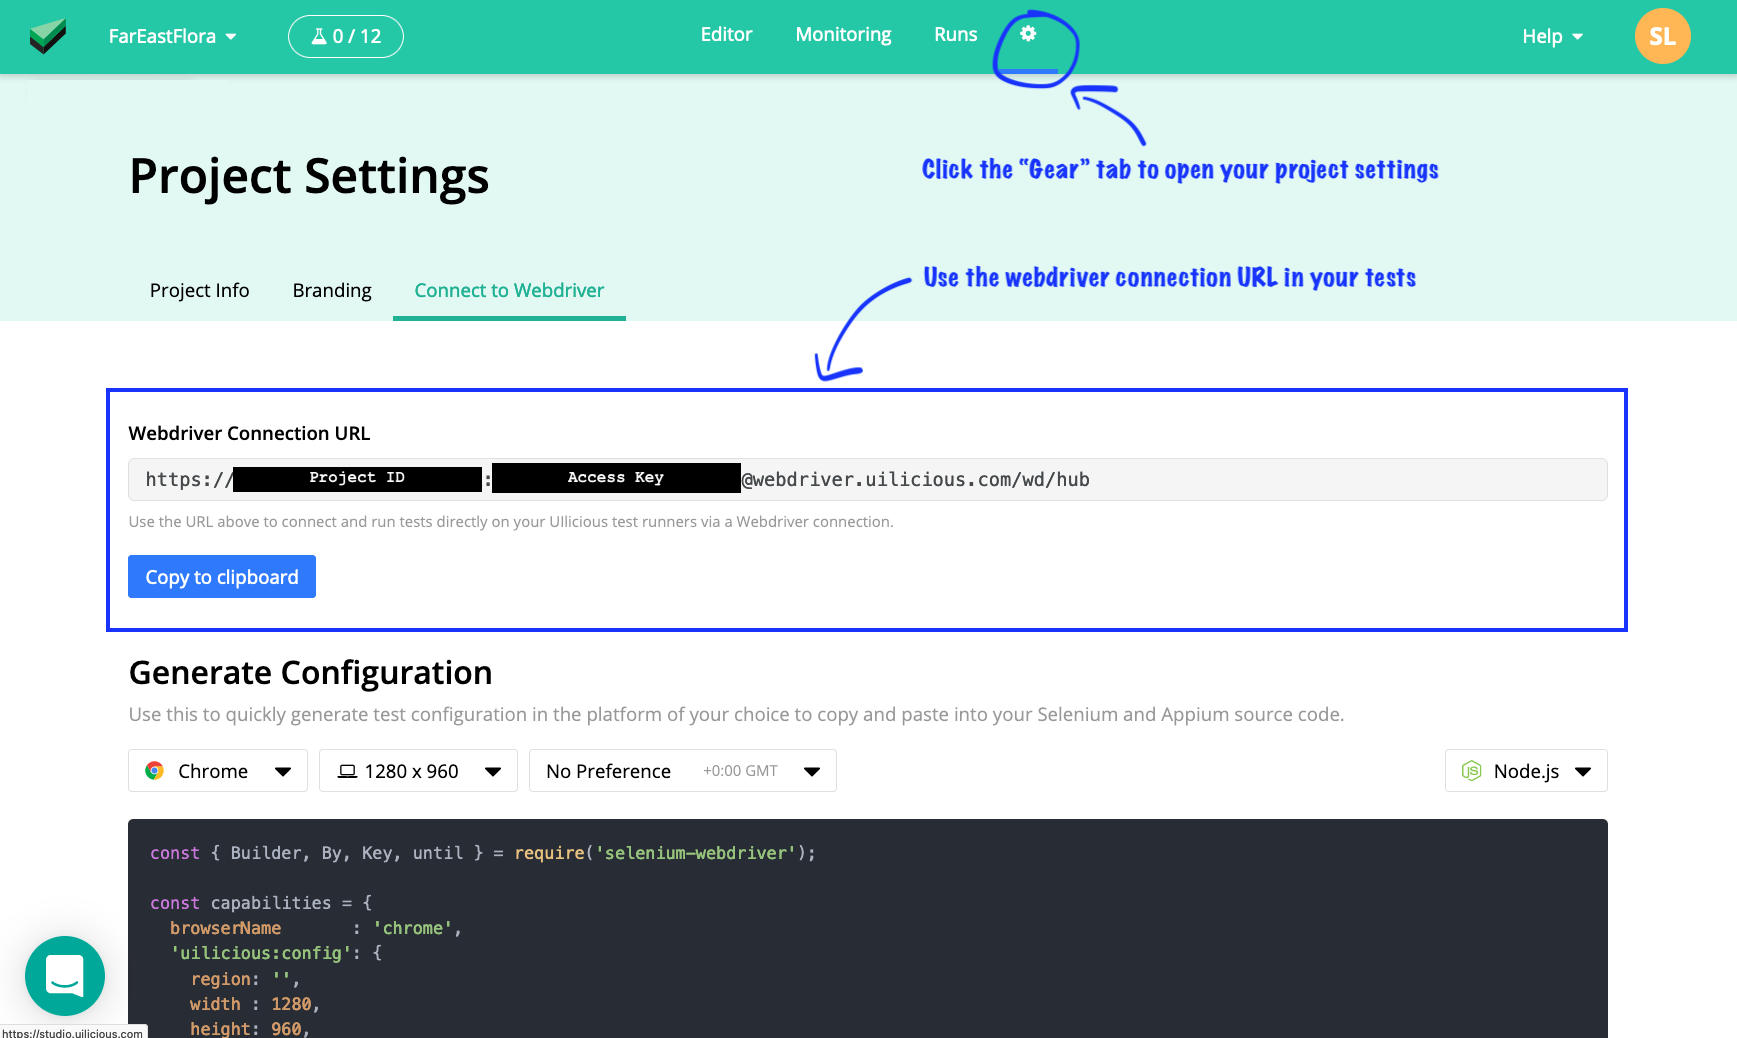
Follow the following steps to get the UIlicious Webdriver Connection URL
- Log in to UIlicious
- Go to Project Settings
- Open the Connect to Webdriver tab
- Copy the Webdriver Connection URL
Step 2: Configure remote web driver connection
Now, configure your test to connect to the UIlicious Testing Grid using the Webdriver Connection URL that you have previously copied.
For Selenium tests, you can copy the examples below and replace <UILICIOUS WEBDRIVER URL> with copied URL.
ChromeOptions chromeOptions = new ChromeOptions();
WebDriver driver = new RemoteWebDriver(new URL("<UILICIOUS WEBDRIVER URL>"), chromeOptions);
driver.get("http://www.google.com");
driver.quit();
from selenium import webdriver

chrome_options = webdriver.ChromeOptions()
driver = webdriver.Remote(
    command_executor='<UILICIOUS WEBDRIVER URL>',
    options=chrome_options
)
driver.get("http://www.google.com")
driver.quit()
var chromeOptions = new ChromeOptions();
IWebDriver driver = new RemoteWebDriver(new Uri("<UILICIOUS WEBDRIVER URL>"), chromeOptions);
driver.Navigate().GoToUrl("http://www.google.com");
driver.Quit();
caps = Selenium::WebDriver::Remote::Capabilities.chrome
driver = Selenium::WebDriver.for :remote, :url => "<UILICIOUS WEBDRIVER URL>", :desired_capabilities => caps
const { Builder } = require("selenium-webdriver");
const chrome = require("selenium-webdriver/chrome");
let opts = new chrome.Options();

async function runTest() {
    let driver = new Builder()
        .usingServer("<UILICIOUS WEBDRIVER URL>")
        .forBrowser('chrome')
        .setChromeOptions(opts)
        .build();
    try {
        await driver.get('http://www.google.com');
    } finally {
        await driver.quit();
    }
}

runTest()
If you are using another library that requires the remote webdriver connection parameters to be configured individually instead of a single string, you can refer to the connection information below:
| Connection Parameter | Value |
|---|---|
| protocol | https |
| hostname | webdriver.uilicious.com |
| port | 80 |
| path | /wd/hub |
| user | Your Project ID |
| key | Your Access Key |
Your project ID and access key will be used as the user and key for authentication. You can get your project ID and access key from the Webdriver Connection URL that you've copied, which is follows the format:
https://<PROJECT_ID>:<ACCESS_KEY>@webdriver.uilicious.com/wd/hub
Configure session capabilities
When starting a webdriver session, you need to specify the test configuration in the capabilties object:
Here's an example:
const capabilities = {
  browserName       : 'firefox', // required
  'uilicious:config': {
    name: "Name of the test", // optional
    width : 2560, // optional
    height: 1440, // optional
    region: 'netherlands-amsterdam', // optional
    userAgent: "", // optional
  }
}
Browser
To configure which browser to run the test on, set the browserName:
- Use
chromefor Google Chrome - Use
firefoxfor Firefox - Use
safarifor MacOS Safari - Use
edgechromiumfor Microsoft Edge Chromium - Use
edgefor Microsoft Edge (Legacy EdgeHTML) - Use
ie11for Internet Explore 11
const capabilities = {
    browserName : 'firefox' // run the test on "Firefox"
}
Resolution
To configure the initial resolution of the browser window, set the width and height to the desired width and height in pixels in the uilicious:config object in the capabilities object:
const capabilities = {
    browserName : 'firefox'
    'uilicious:config': {
        // Set the initial resolution to 2560 x 1440
        width : 2560,
        height: 1440,
    }
}
Region
To configure the geolocation to run the test from, set the region in the uilicious:config object in the capabilities object:
- Asia Pacific regions:
- Use
india-bangalorefor India, Bangalore - Use
hongkongfor HongKong - Use
indonesia-jarkatafor Indonesia, Jarkata - Use
singaporefor Singapore
- Use
- Europe regions:
- Use
netherlands-amsterdamfor Netherlands, Amsterdam - Use
germany-frankfurtfor Germany, Frankfurt - Use
unitedkingdomfor United Kingdom, London
- Use
- North America regions:
- Use
usa-newyorkfor USA, New York - Use
usa-sanfrancfor USA, San Francisco - Use
canada-torontofor Canada, Toronto
- Use
const capabilities = {
    browserName : 'firefox'
    'uilicious:config': {
        width : 2560,
        height: 1440,
        // Run the test from "Singapore"
        region: "singapore"
    }
}
User Agent
To configure the user agent of the test browser, set the userAgent property in the uilicious:config object in the capabilities object:
const capabilities = {
    browserName : 'firefox'
    'uilicious:config': {
        width : 2560,
        height: 1440,
        // Use an IPhone Safari browser User Agent
        userAgent: "Mozilla/5.0 (iPhone; CPU iPhone OS 15_6_1 like Mac OS X) AppleWebKit/605.1.15 (KHTML, like Gecko) Version/15.6 Mobile/15E148 Safari/604.1"
    }
}
Test Name
You can view the tests that were ran under the "Runs" tab in the UIlicious Studio. These test runs will be titled "Webdriver Session" by default. If you want the test runs to have a more meaningful name, you can set the name property in the uilicious:config object in the capabilities object:
const capabilities = {
    browserName : 'firefox'
    'uilicious:config': {
        width : 2560,
        height: 1440,
        // Set a meaningful name for the test run
        name: "TC83 - purchase as guest user"
    }
}