Step-by-step guide to testing Web3 applications
Table of contents

What is a Web3 application?
Web3 applications are applications based on blockchain and leverage decentralized networks such as the Ethereum Blockchain, Polygon Blockchain and the likes to perform trustless transactions. Examples of Web3 applications include decentralized finance (DeFi) platforms like Compound and Uniswap, non-fungible token (NFT) marketplaces like OpenSea, and blockchain-based gaming platforms such as Axie Infinity.
Web3 applications require access to the users’ crypto-wallet, often through browser extensions such as MetaMask.
Challenges in testing Web3 applications
The most common scenarios for testing Web3 applications are testing transaction flows, for example, creating a transaction, confirming the transaction on the blockchain, and then checking that the application has updated correctly after the transaction.
For software developers and testers, automating testing Web3 applications presents some challenges:
Slow: Creating transactions on a blockchain is very slow and often the biggest bottleneck when it comes to testing Web3 applications.
Costly and irreversible: Performing transactions on a blockchain involve real finacial costs per transactions, and transactions are irreversible, making it impractical to test at scale.
Difficult to automate: Web3 applications require the use of browser extensions to connect a crypto-wallet to the application. One of the most popular extensions is MetaMask. While browser automation tools such as Selenium and Cypress make it possible to control browsers for automated testing for web application, however the setup required to install the browser extension and setup the wallet on the extension on the test browser is often complex and difficult.
Tools and strategy for testing Web3 applications
With the right test strategy and tools, automating tests for Web3 applications can be simple, fast, and inexpensive.
To setup automation for end-to-end tests for Web3 applications, we need:
- A testnet service for emulating transactions on a blockchain quickly
- A browser automation tool to setup test browsers with the crypto-wallet browser extension and run test automation scripts
In this guide, we'll use BuildBear, a service for provisioning a private testnet to emulate the Ethereum mainnet, and UIlicious, a cross-browser testing service with build-in capabilties for setting and configuring Metamask.
Step-by-step guide for testing Web3 applications
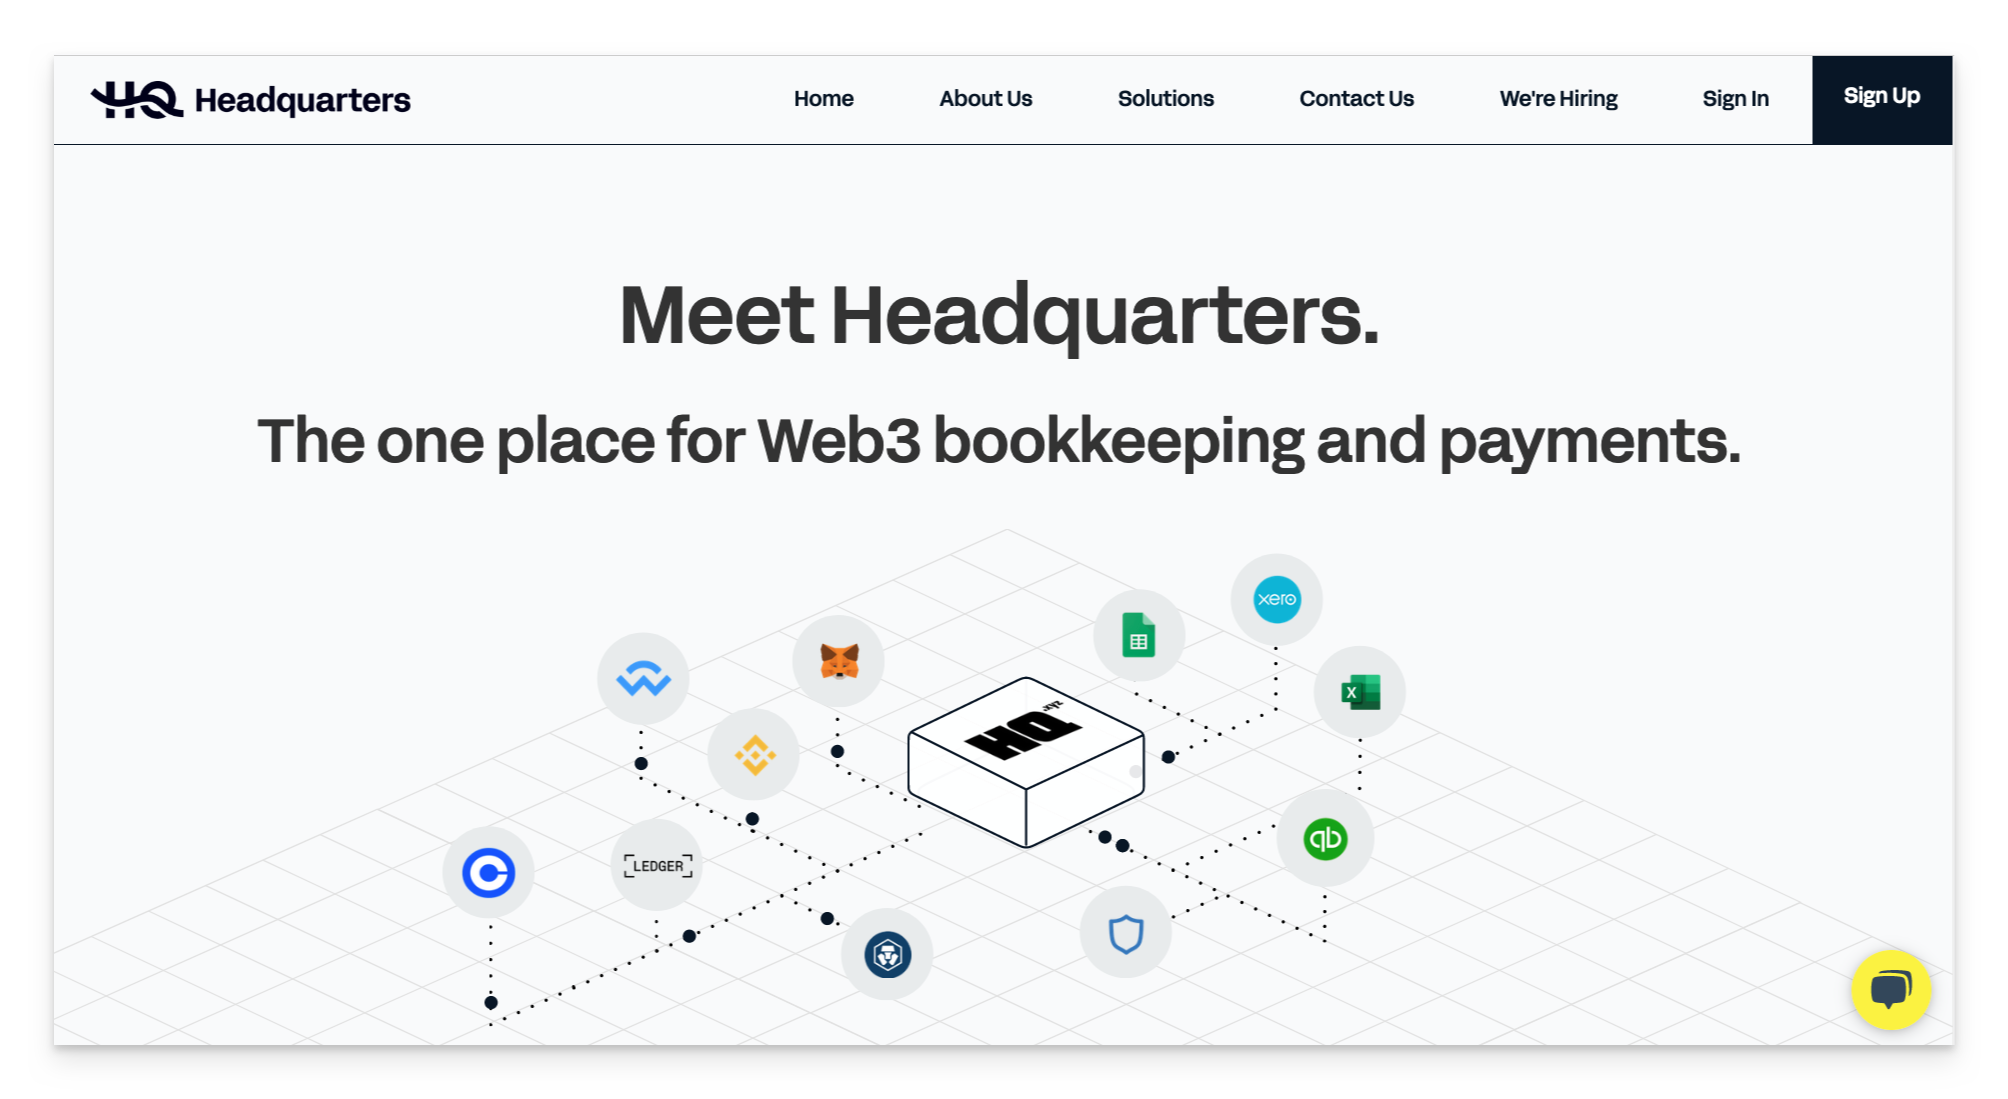
In this guide, we'll be setting up tests for HeadQuarters, a SaaS application for Web3 bookkeeping and payments.
Part 1: Setting up a private testnet with Buildbear
First we need to setup a private testnet for emulate transactions on a blockchain.
Testnets are test blockchain networks that act similar to the main networks they are associated with. Using a testnet is important because mistakes or failures on the real network can be costly and sometimes irreversible. Testnet operates separately from the main network and allows developers to test their projects without any real financial risks or consequences. On a testnet, developers can freely deploy, test, and run their blockchain applications.
We'll be using Buildbear to provision a private testnet.
BuildBear is a cutting-edge platform for Solidity smart contract testing, that simplifies the process of creating a custom private testnet sandbox of different blockchain networks such as Ethereum, Polygon, Binance Smart Chain, Avalanche, Fantom, Optimism, and Arbitrum Mainnets. BuildBear testnets allows you to mint unlimited ERC20 tokens in a single click, and performs transactions in under 3 seconds. Buildbear also offers convenient features to support testing and debugging, such as a built-in Faucet for minting testnet tokens and an Explorer for easily tracking transactions.
Step 1.1: Create a private testnet on Buildbear
If you don't already have a BuildBear account, register for a new account here
Once you are logged in, click "Create Buildbear Testnet" from the BuildBear dashboard.

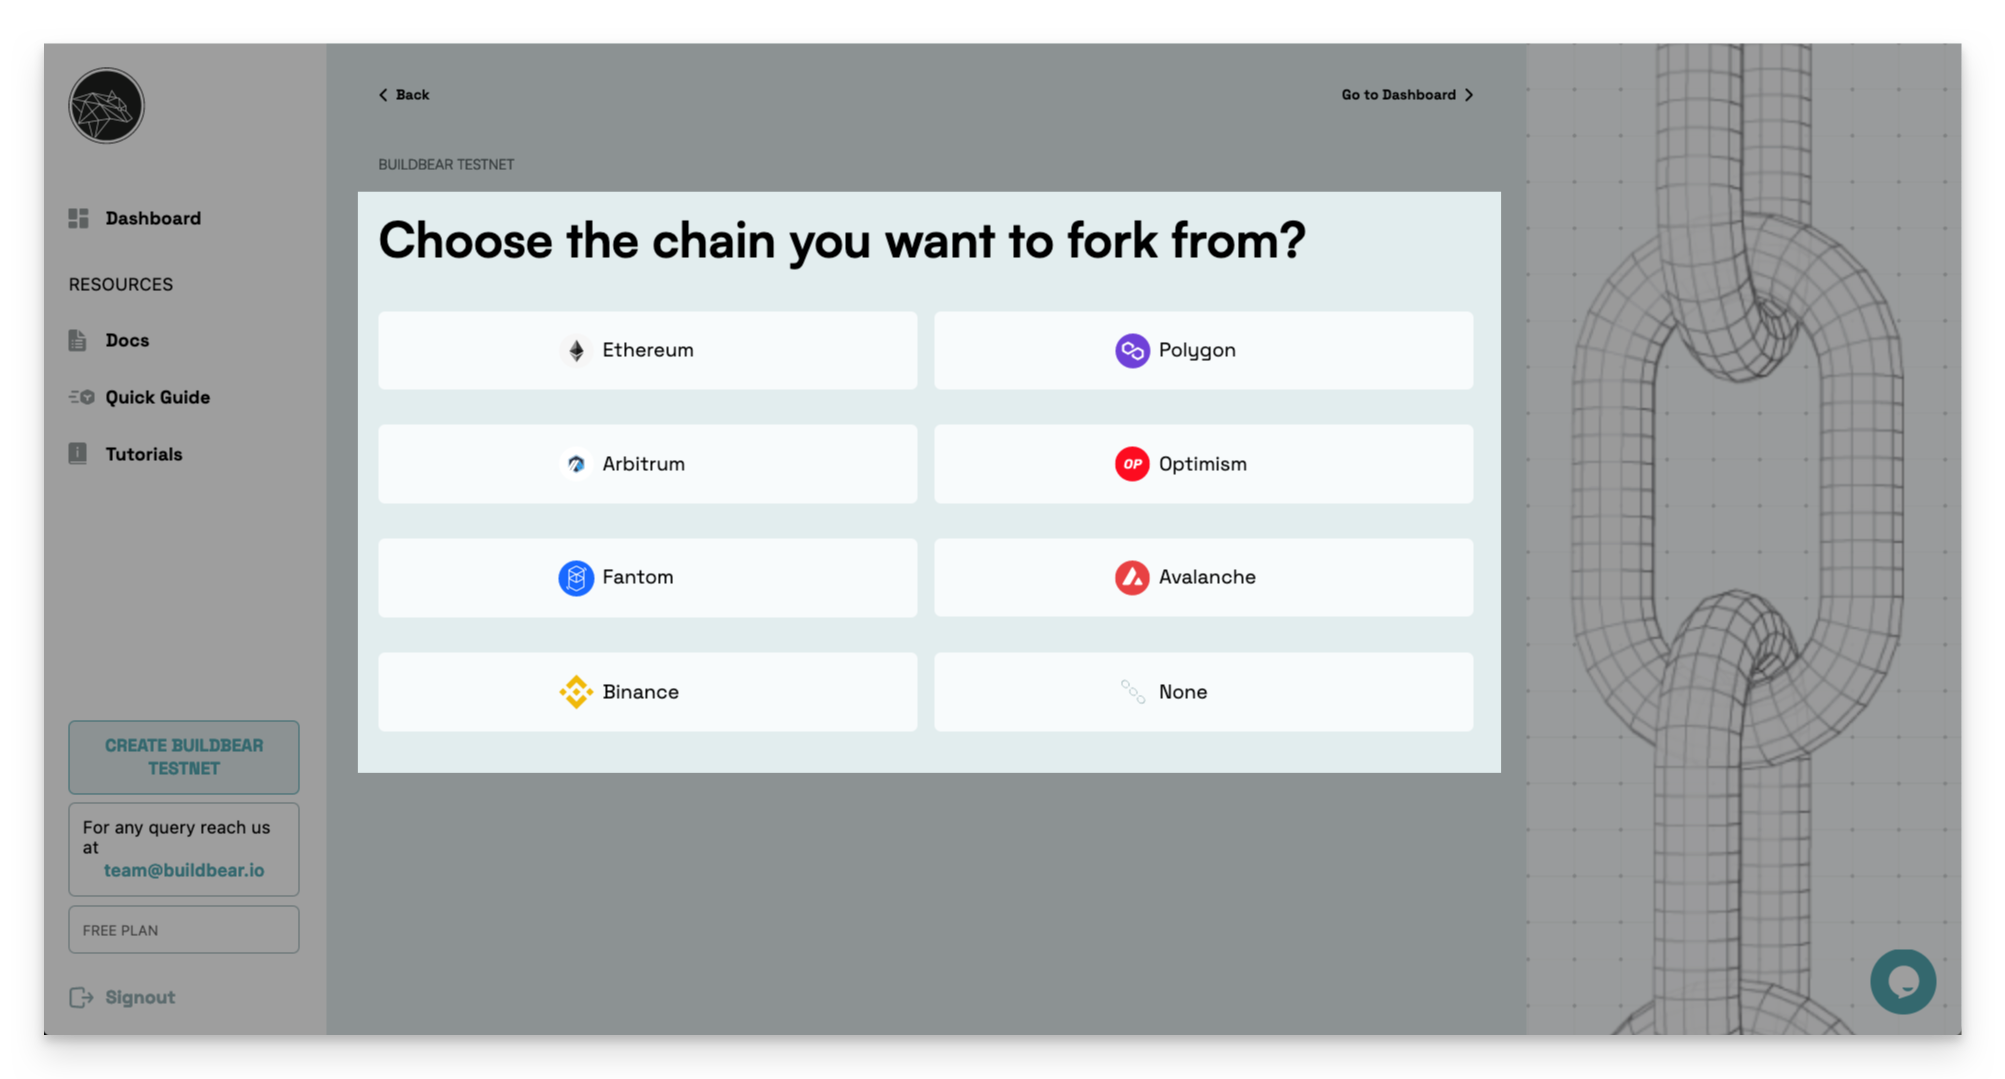
Select the blockchain network that you want fork to create a testnet from.
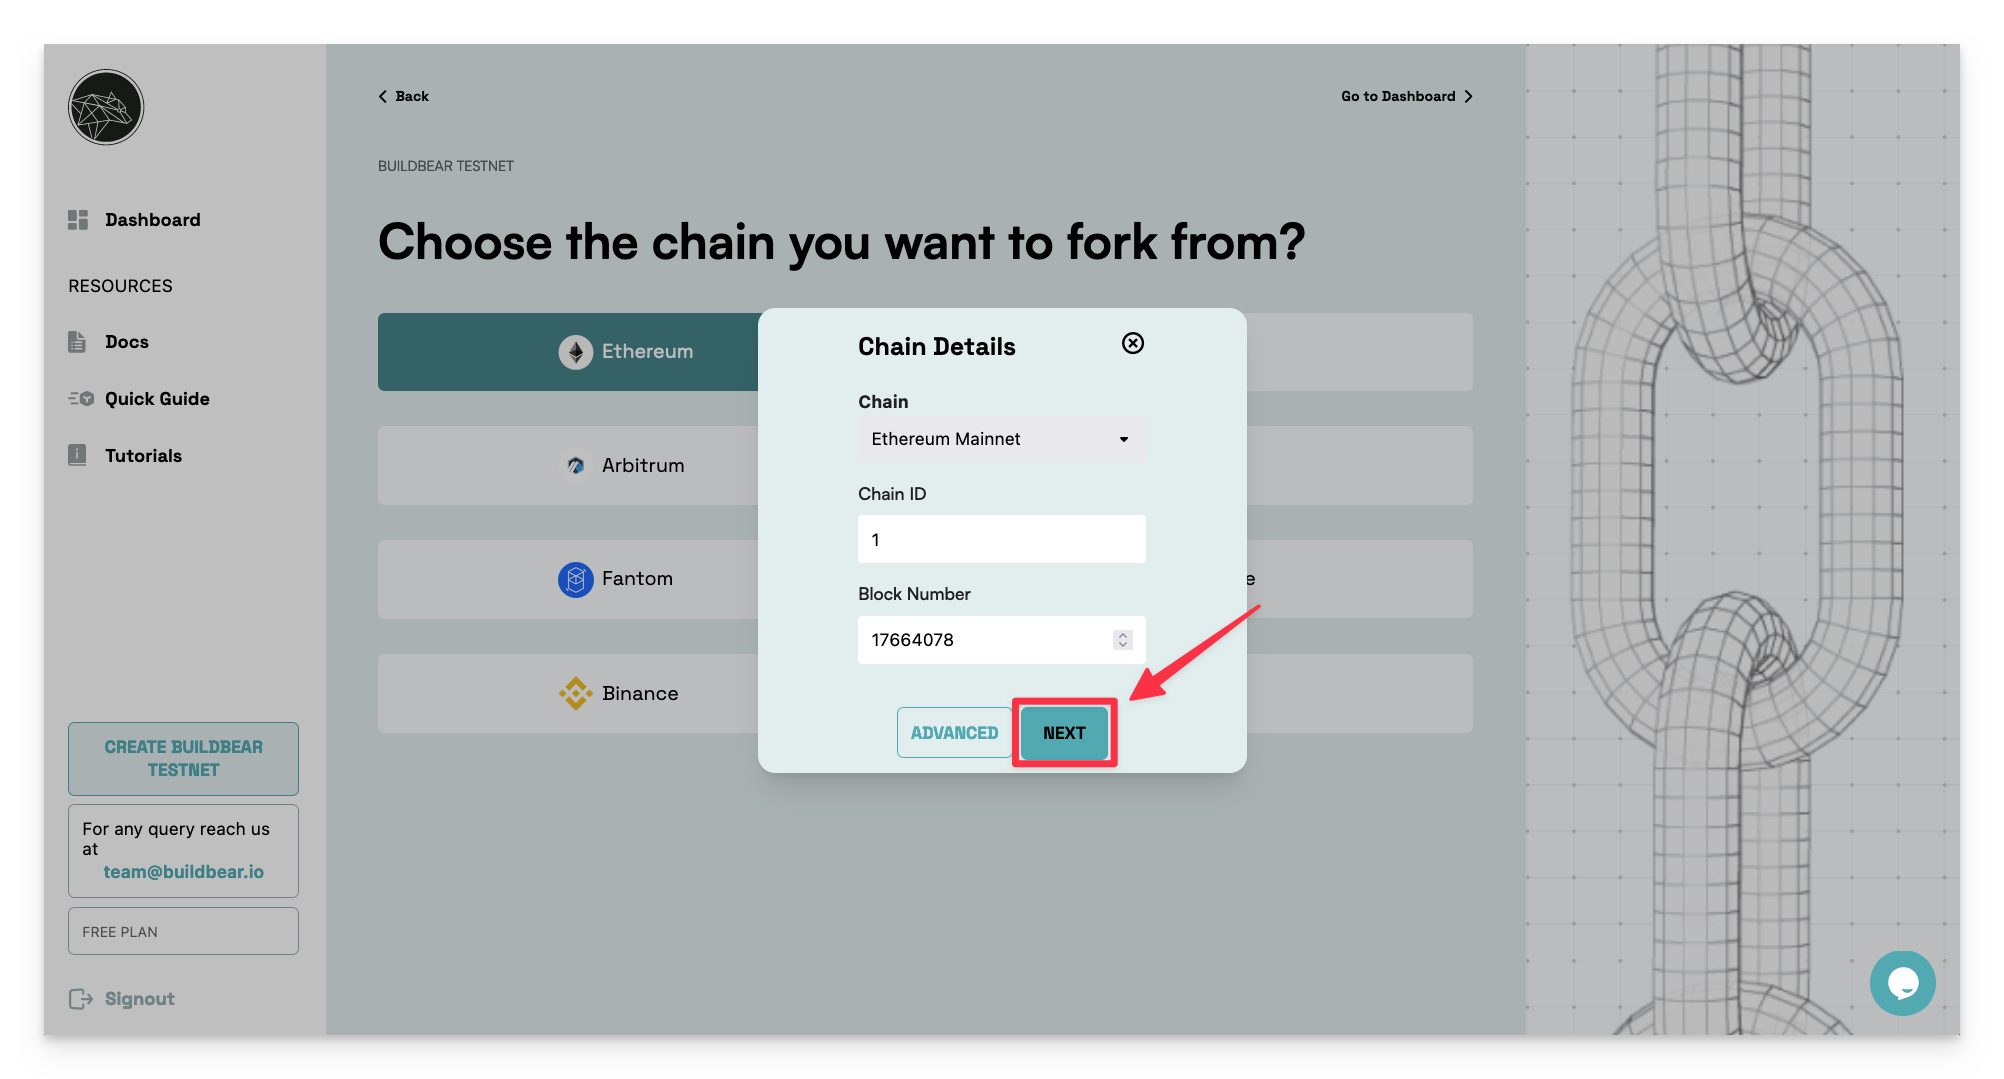
The next screen shows you the Chain Details. Click "Next".
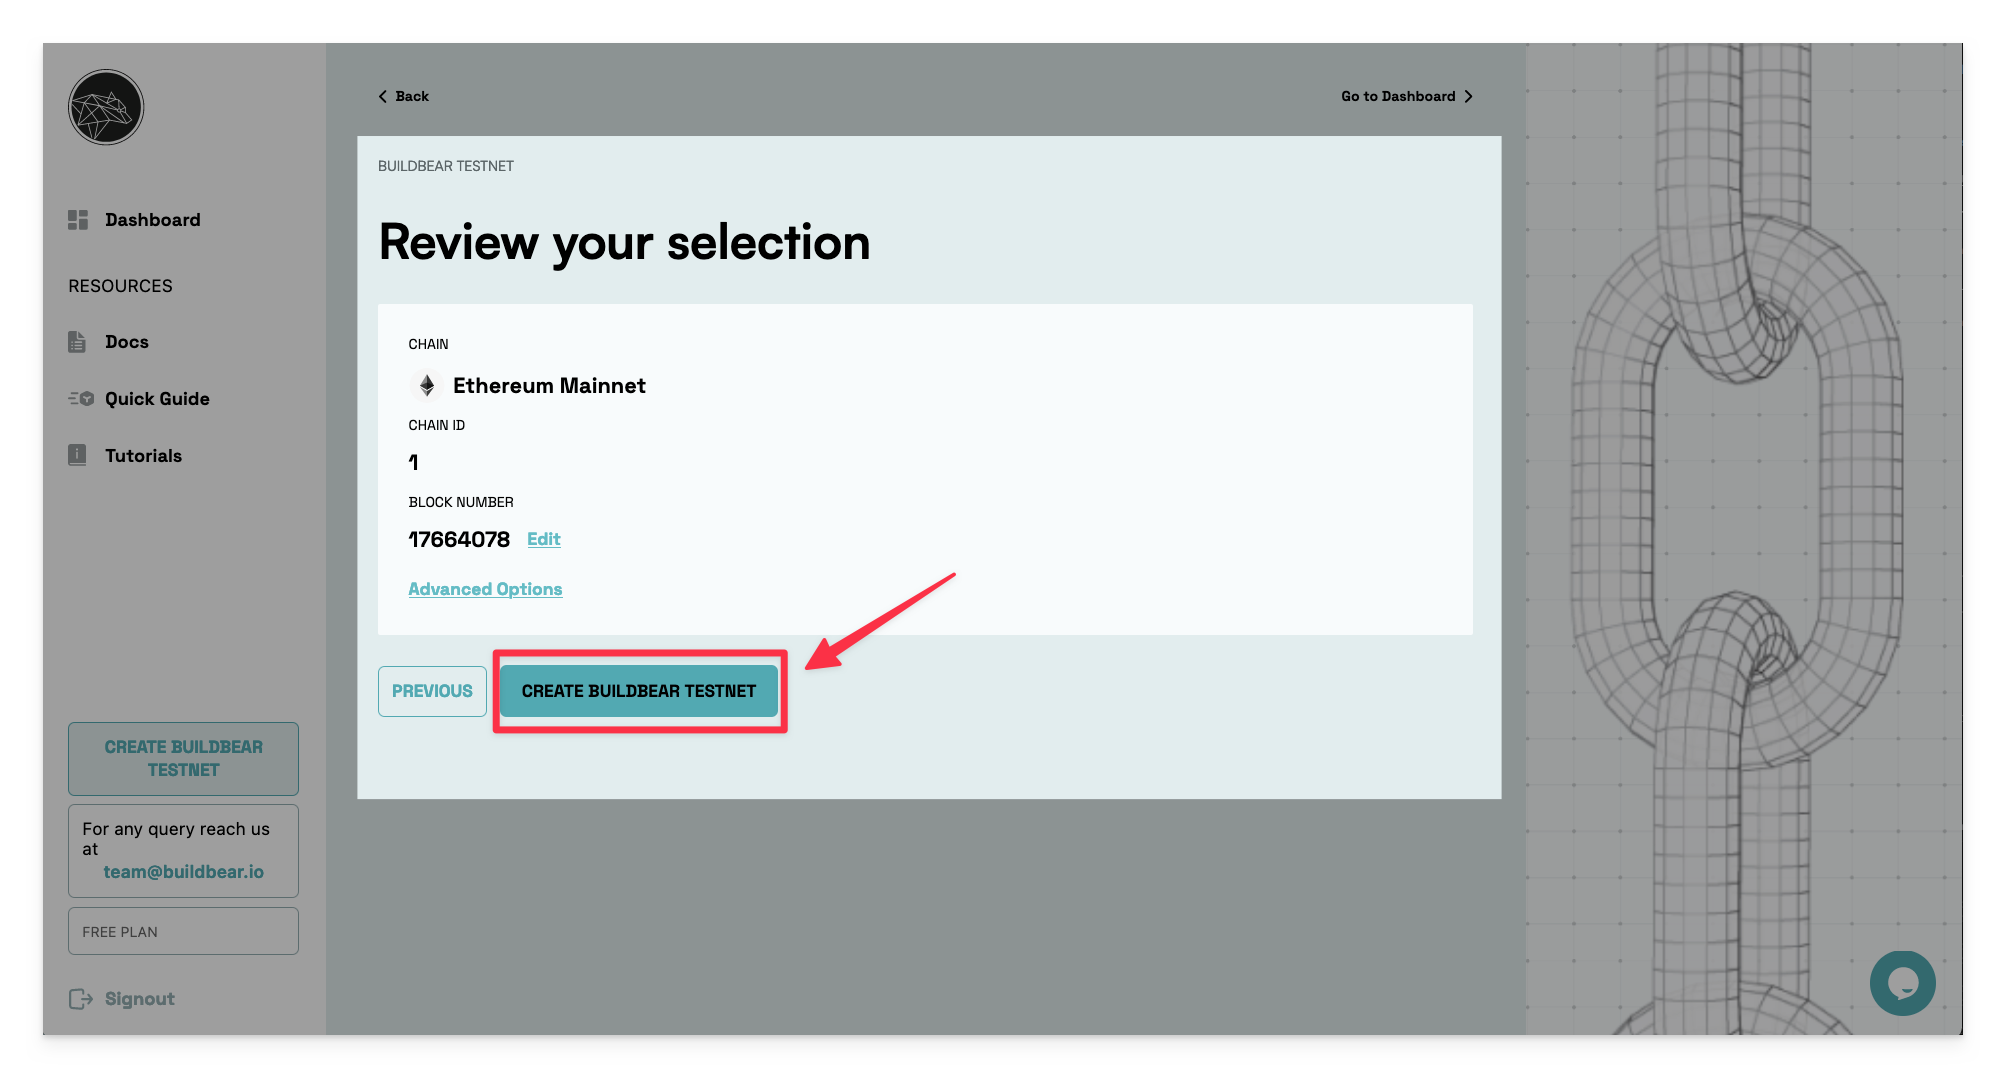
Review your selection, and click "Create BuildBear Testnet" to proceed.
It will take just a minute your new private testnet to be setup. Once it is ready, the status of the testnet change from "starting" to "live".
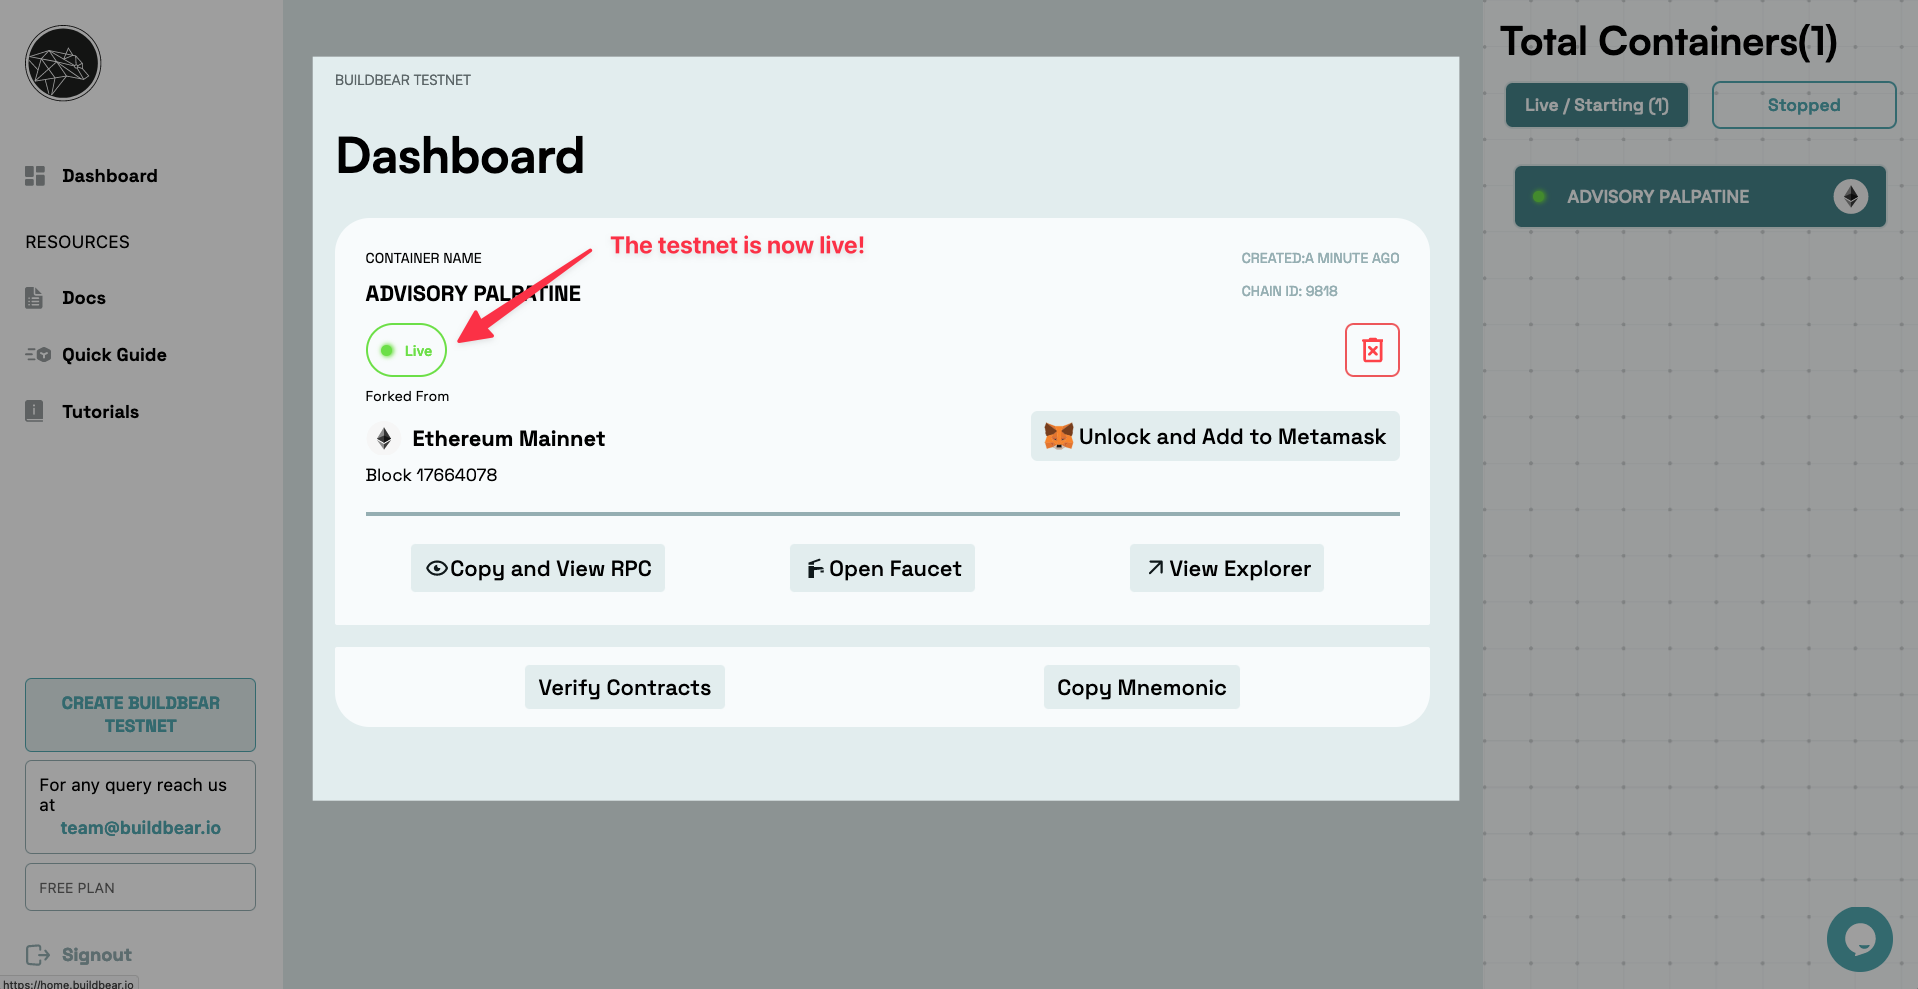
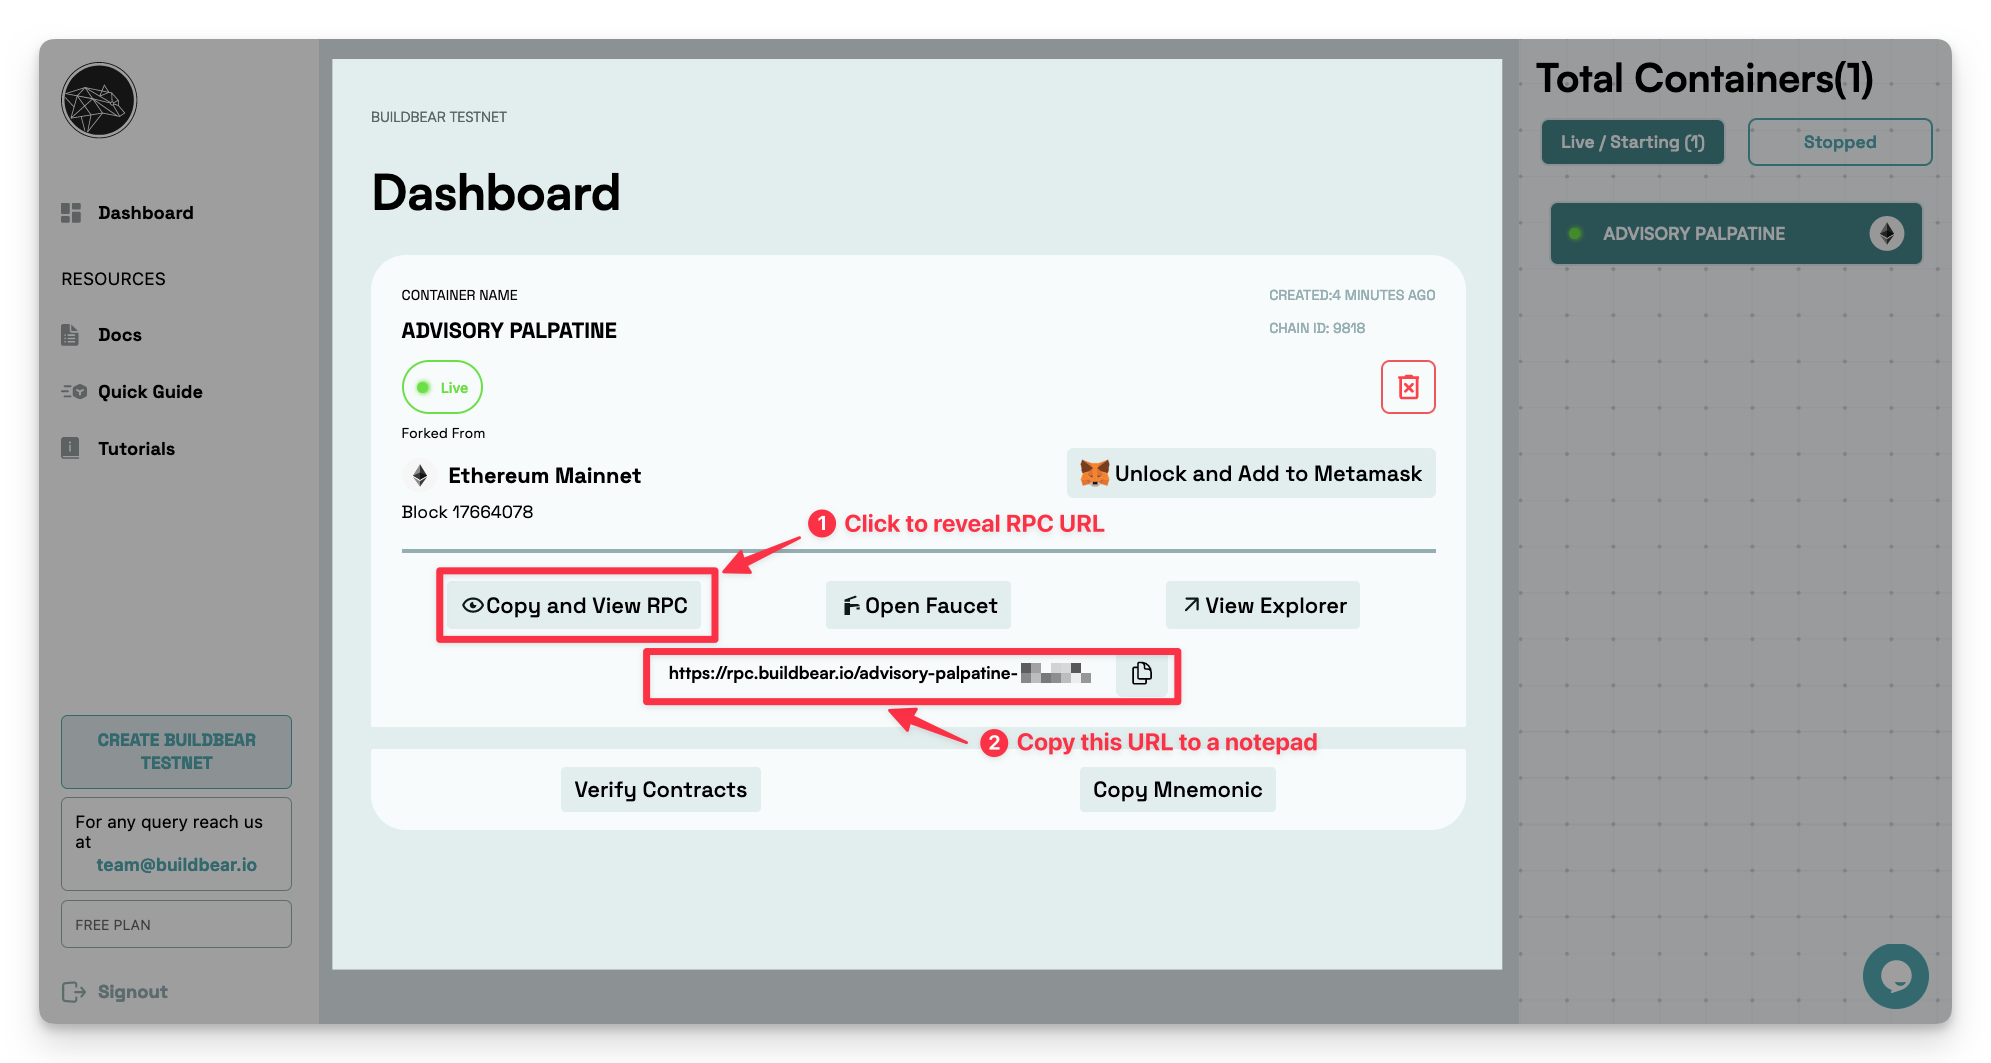
Next, click "Copy and View RPC" to reveal the RPC url of the testnet. Copy the RPC url to a notepad, you will need this later.
Step 1.2: Loading a test wallet with value
Depending on your test scenario, this step may not be necessary.
In this guide, our test scenario involves making a payment from wallet, so we need to load the wallet with some value.
Let's mint some new tokens on the testnet and add it to the wallet.
Click "Open Faucet" to go to the testnet faucet. 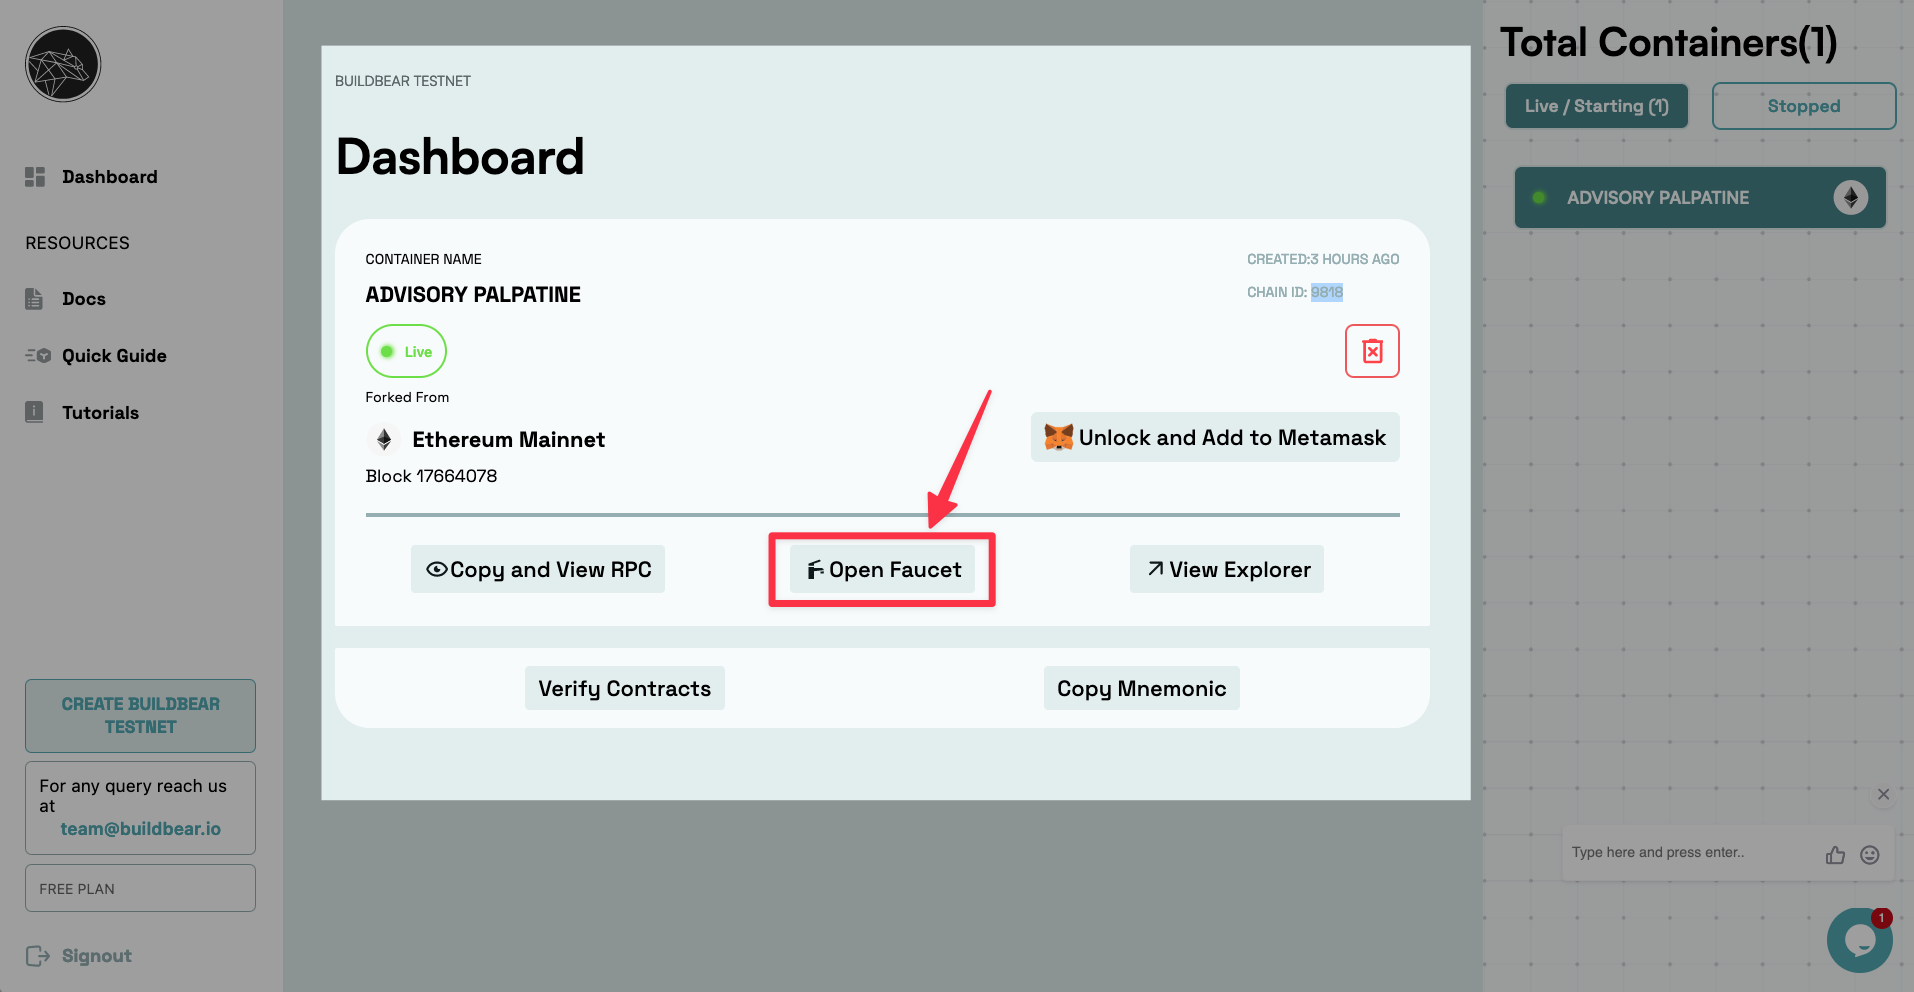
Next, at the Faucet screen, enter the address of the wallet to add new tokens to, and the amount of tokens to mint, then click "Get Native Token".
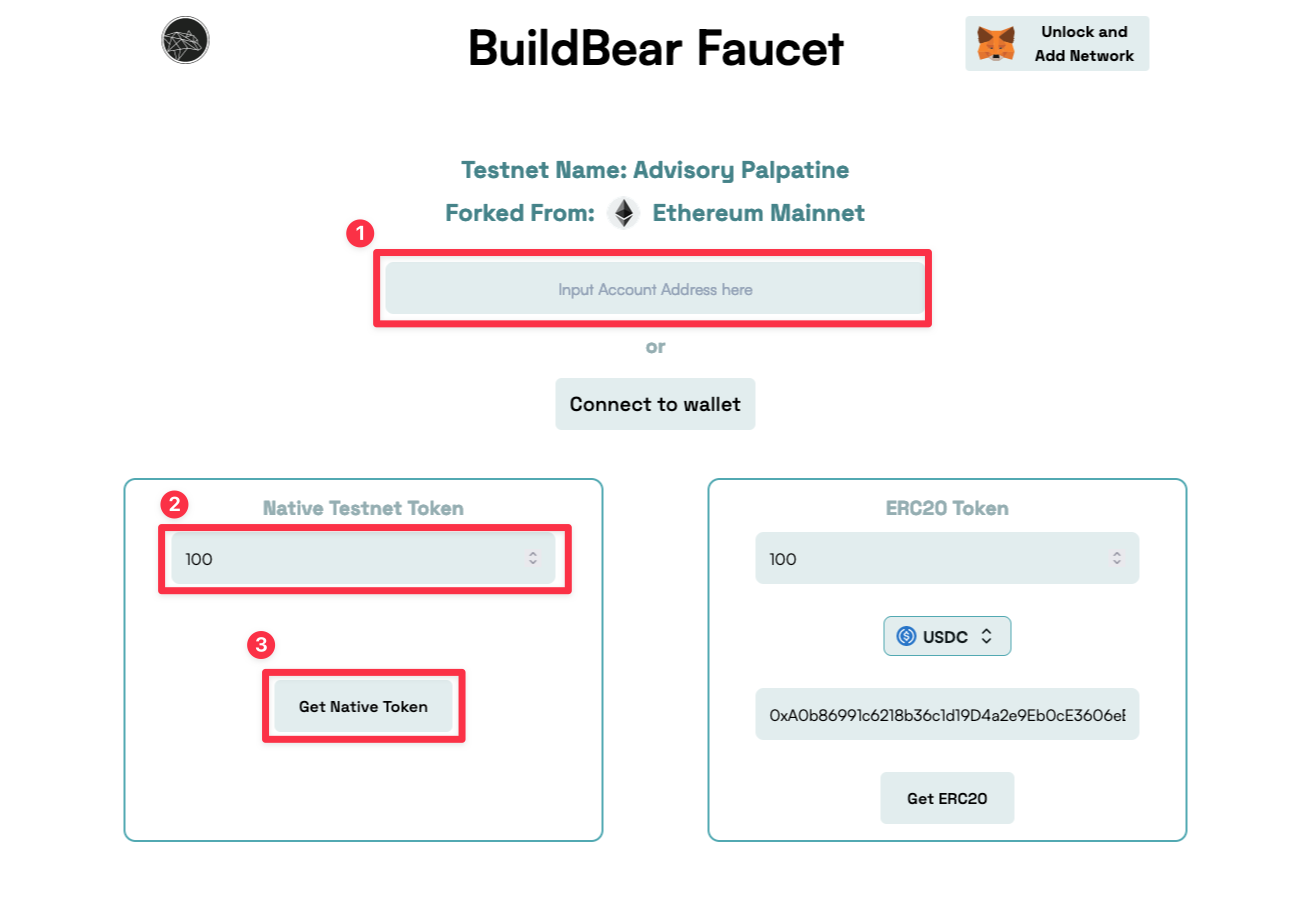
You should see a success message indicating that operation is successful. Alternatively, you can check the transaction and the wallet balance using the testnet explorer.
Click "View Explorer" to open the testnet explorer.
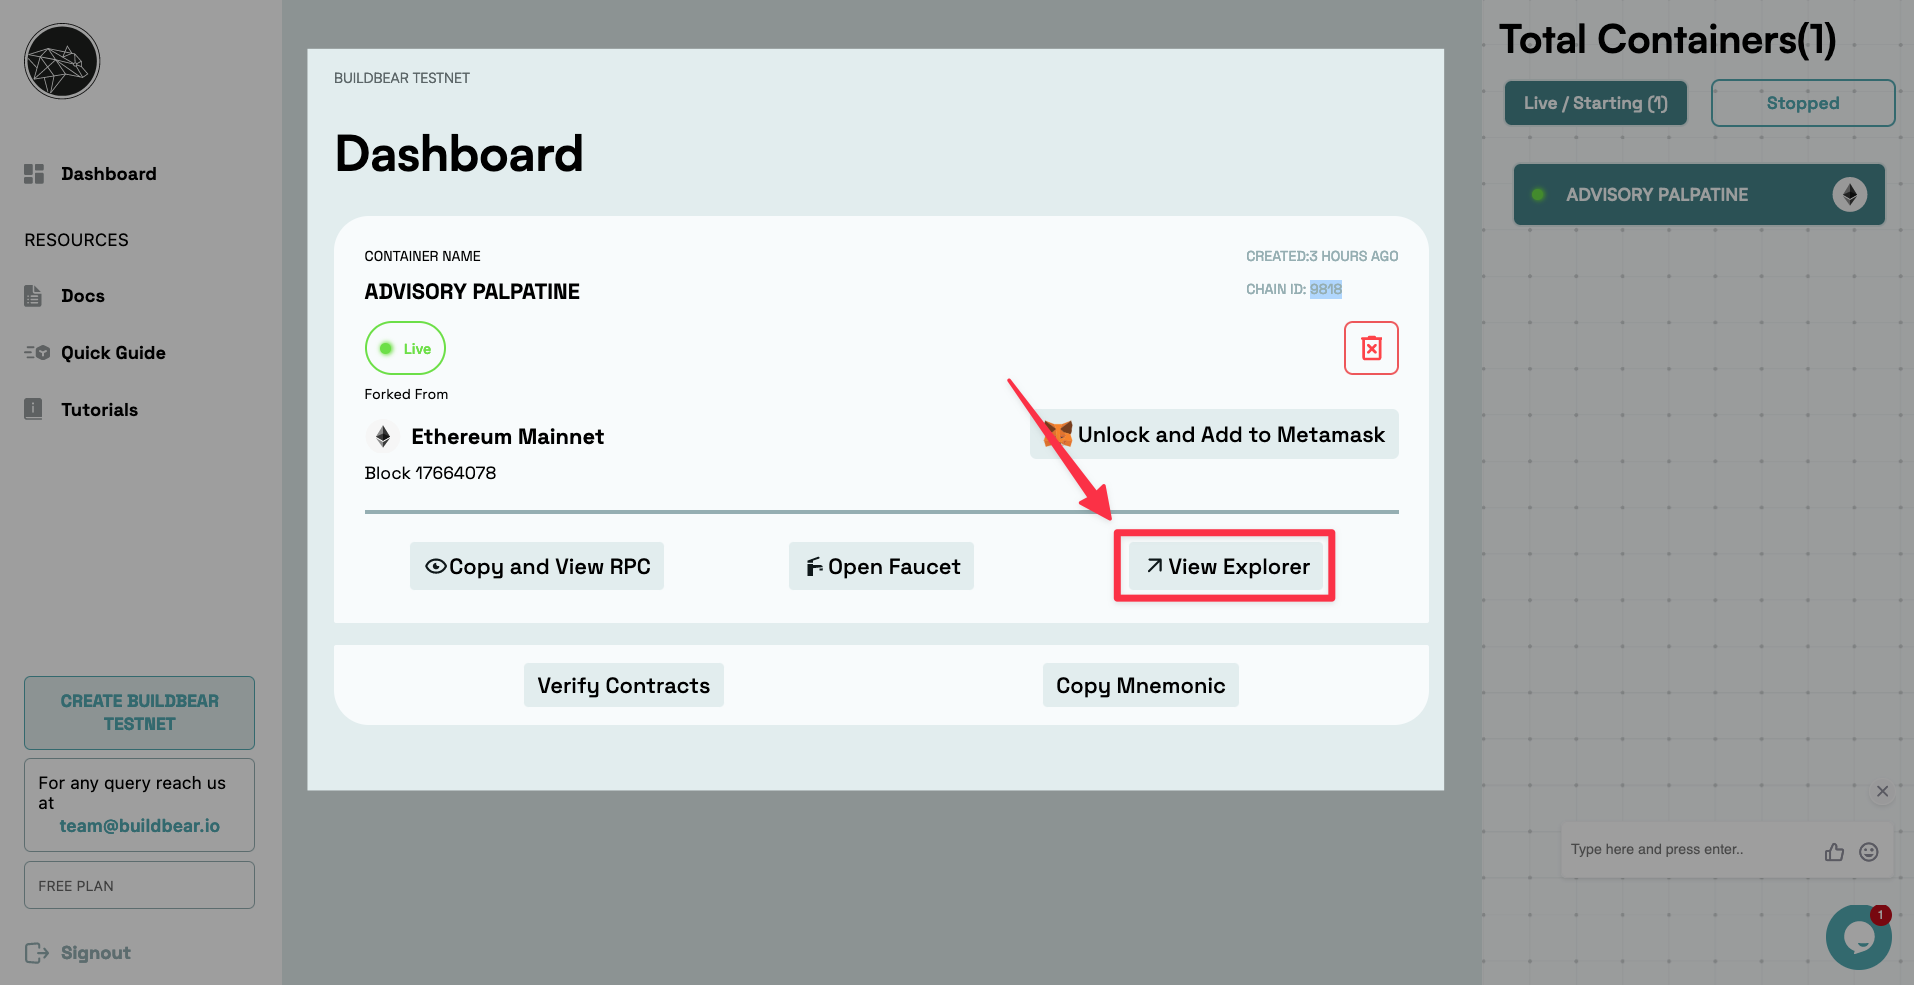
Enter the wallet's address in the search bar to query transactions for the wallet and check the status.
Part 2: Automating the test with UIlicious
Manual tests for web applications can be automated with the help of browser automation tools to automatically control the browser and simulate an end user's interaction with the application, and a test framework to inspect the browser and validate the behavior of the application
We'll be using UIlicious to automate testing for web3 application.
UIlicious is a cross-browser testing tool with built-in support for testing applications that interact with the MetaMask browser extension. UIlicious allows you to start a new Chrome browser that already comes with a fresh installation of the MetaMask extension on every test run. With the built-in Metamask plugin, setting up the wallet and the network to use in the MetaMask extension is simplied to just a few lines of code. On top of that, UIlicious low-code keyword-driven test framework makes it very easy to write a test with very minimal coding knowledge required.

Step 2.1: Create a new test
If you don't already have a UIlicious Studio account, register for a new account here.
Log into UIlicious Studio and create a new project.
Open the project and create a new test file.

Step 2.2: Starting a test run on Chrome with MetaMask installed
To start a test run on a browser with MetaMask installed, select “MetaMask” from the browser dropdown and click the “Run” button.
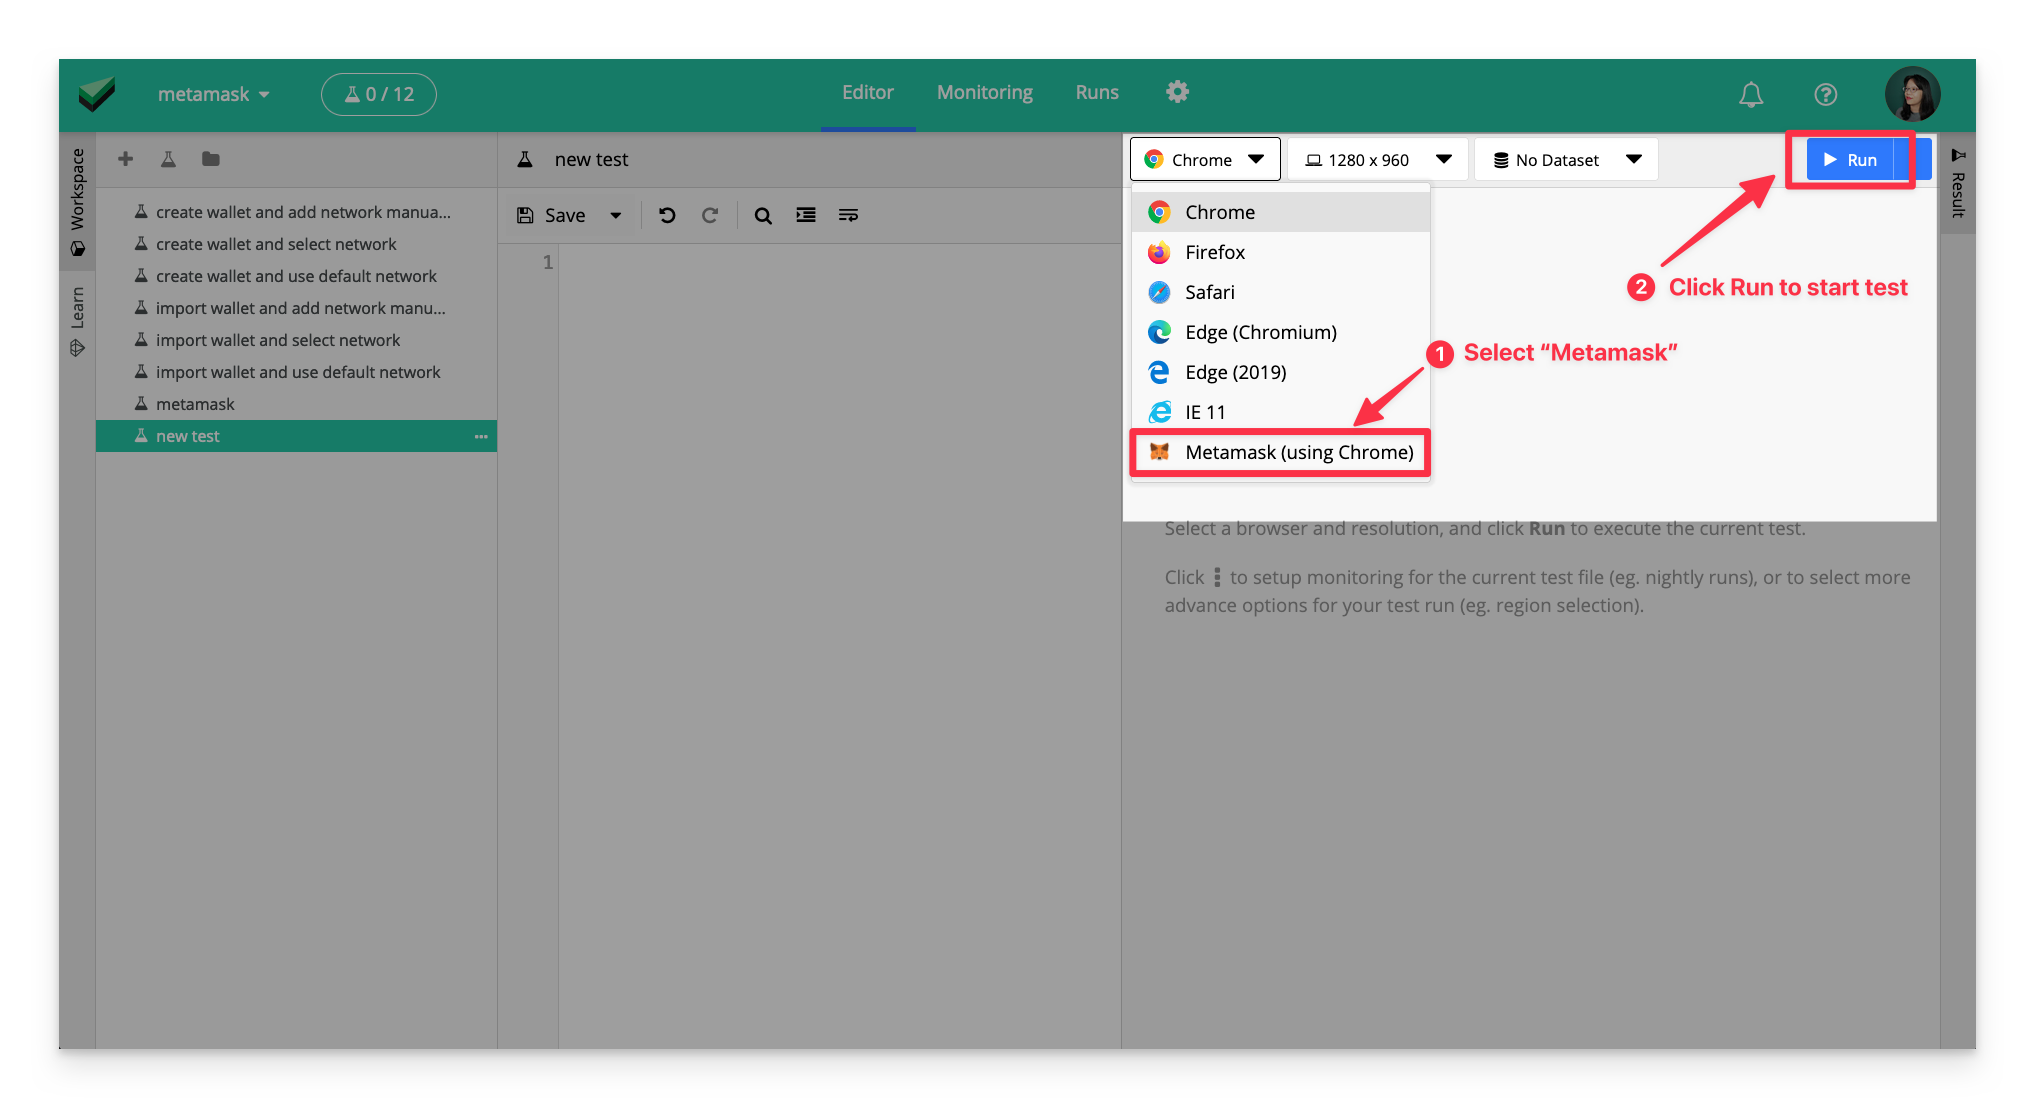
Once the test starts, you'll see that the browser has starts at the Metamask "Let's get started" screen.

Step 2.3: Load metamask plugin
Let's start writing the script to automate testing.
UIlicious provides the built-in “metamask” plugin which includes convenient functions to interact with the MetaMask extension and simplify the setup
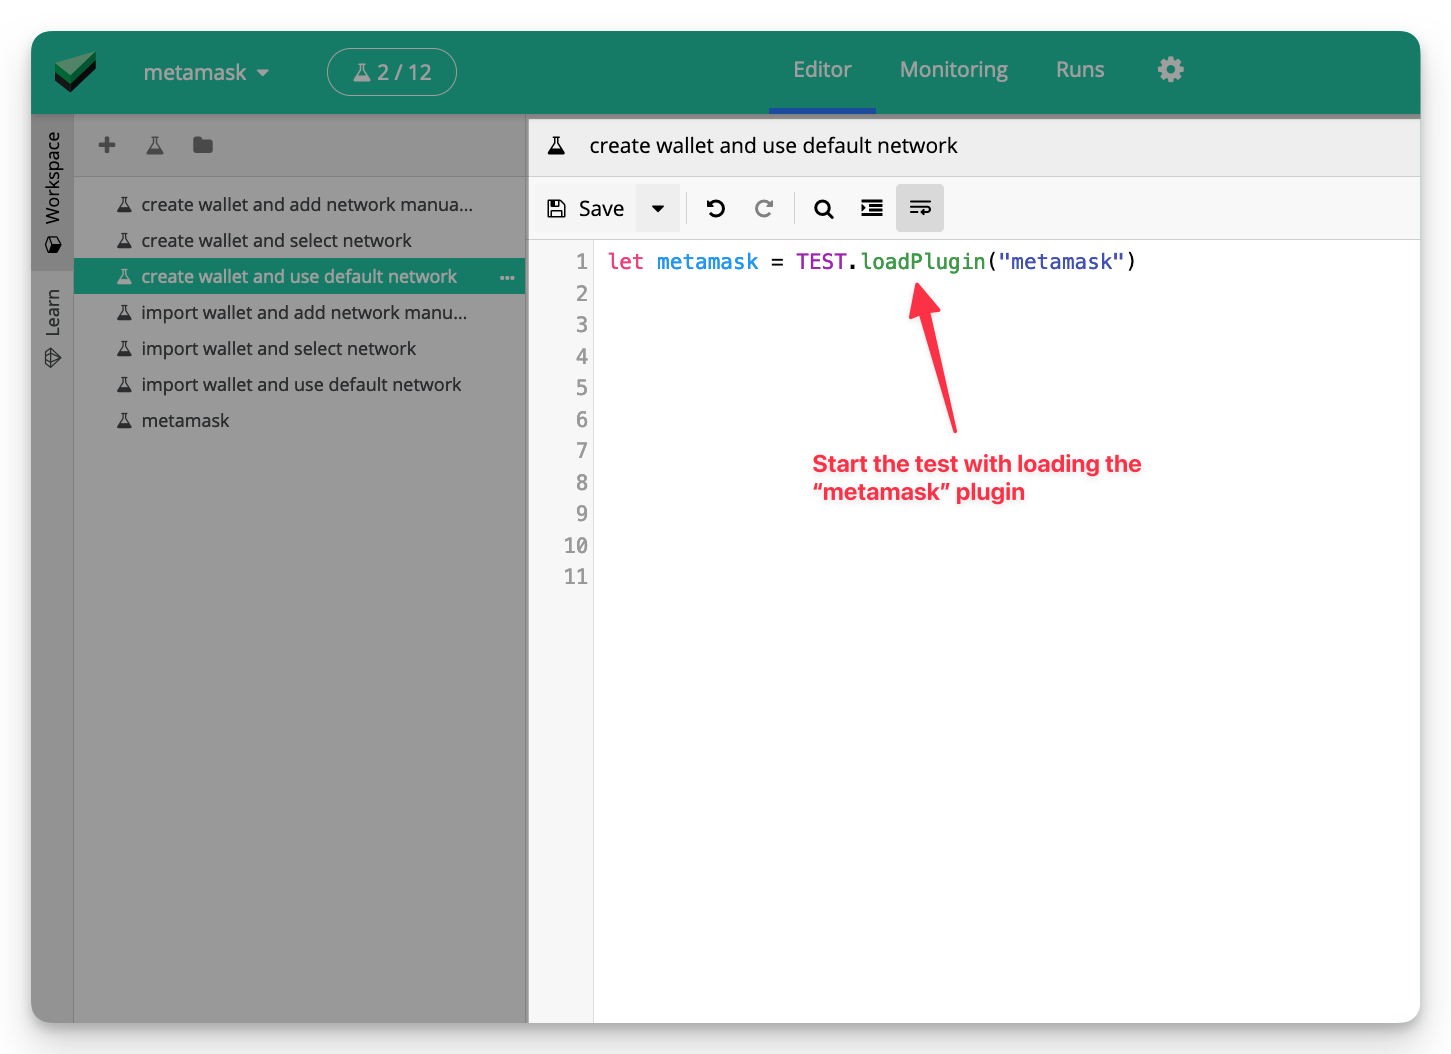
At the start of the test file, add the following line of code to load the "metamask" plugin.
// load the "metamask" plugin
var metamask  = TEST.loadPlugin("metamask")
Step 2.4A: Create a new wallet on MetaMask
We can either set up MetaMask with a new wallet creation or import an existing wallet using the secret recovery passphrase.
To create a new wallet, use metamask.setup() with no additional options.
// load the "metamask" plugin
var metamask  = TEST.loadPlugin("metamask")

// create a new wallet
metamask.setup()
If you want to print the secret passphrase for the newly created wallet to the test log, you can add the following line of code to the test:
// show the passphrase to the test report
TEST.log.info("New Wallet Passphrase: ", metamask.getPassphrase())
Step 2.4B: Import a wallet on MetaMask
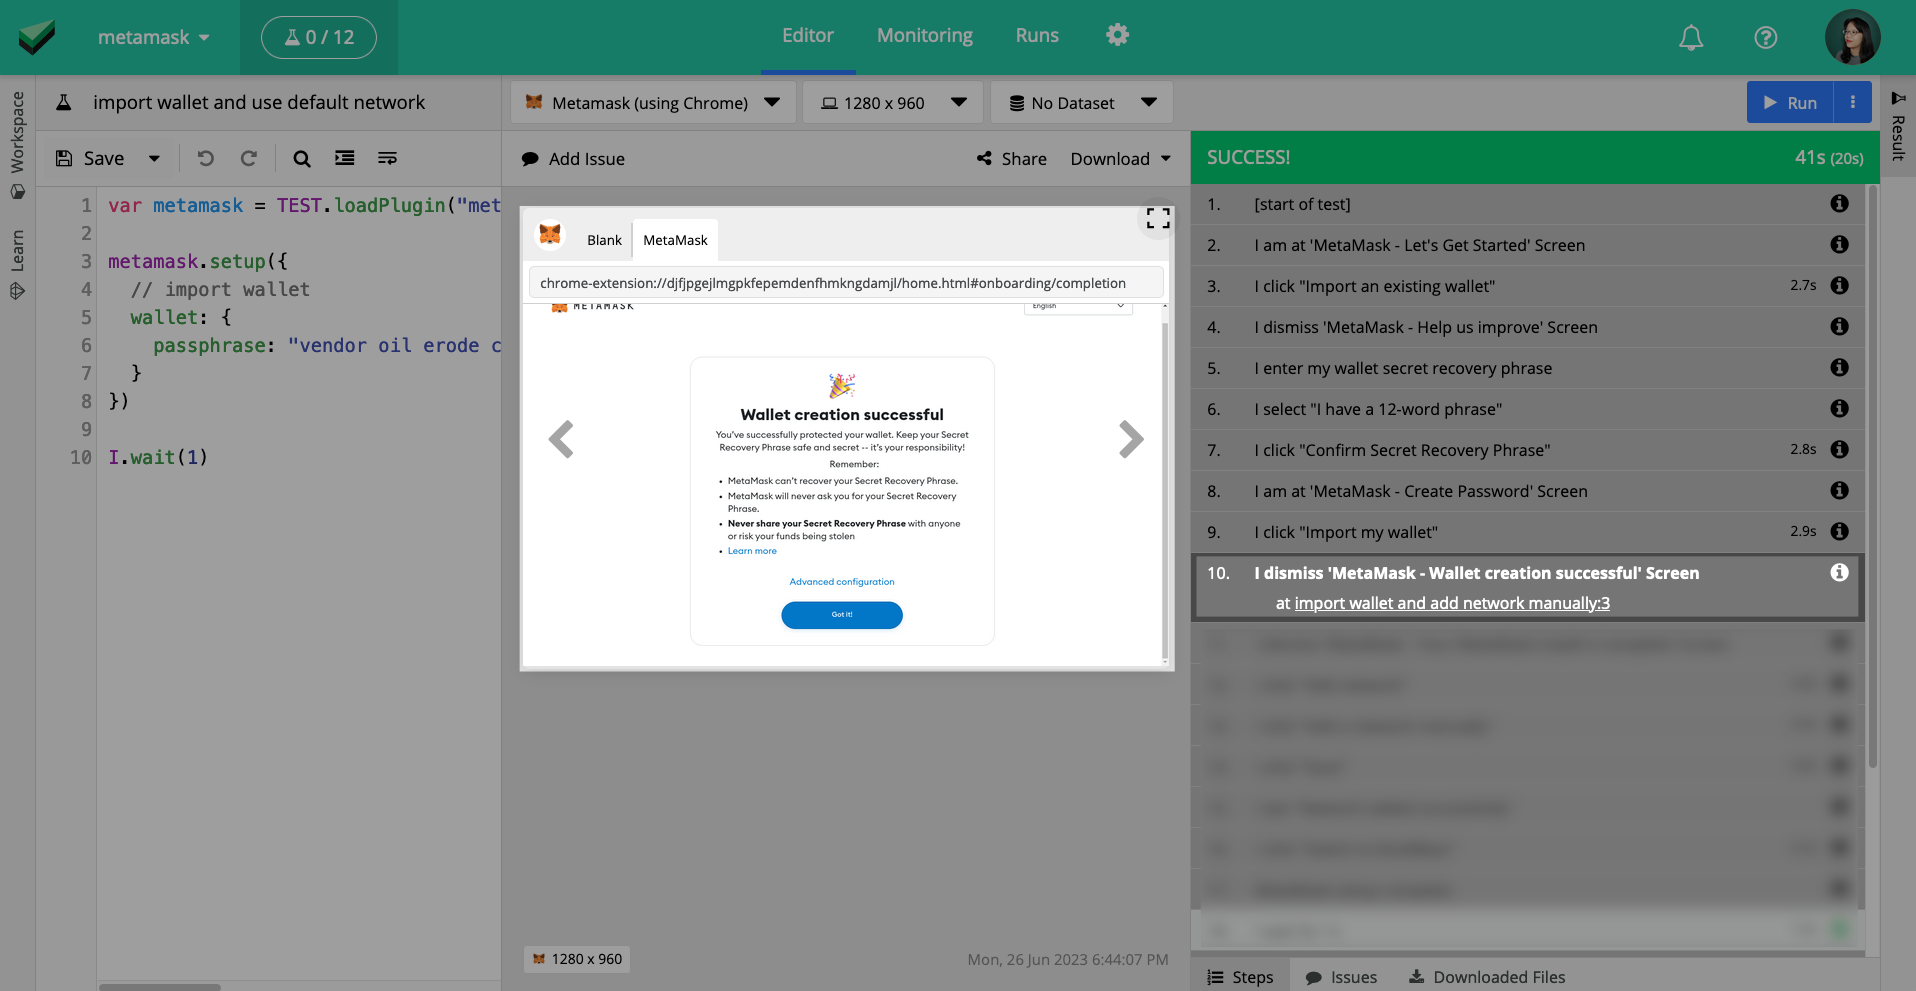
If you want to import an existing wallet instead of creating a new wallet for every test, use metamask.setup() and provide the secret recovery passphrase for the wallet in the wallet.passphrase option.
// load the "metamask" plugin
var metamask  = TEST.loadPlugin("metamask")

// import an existing wallet
metamask.setup({
  wallet: {
	// this is an example passphrase
    passphrase: "mad cow king cheese merchant jolly crab festive pole ten june rain"
  }
})
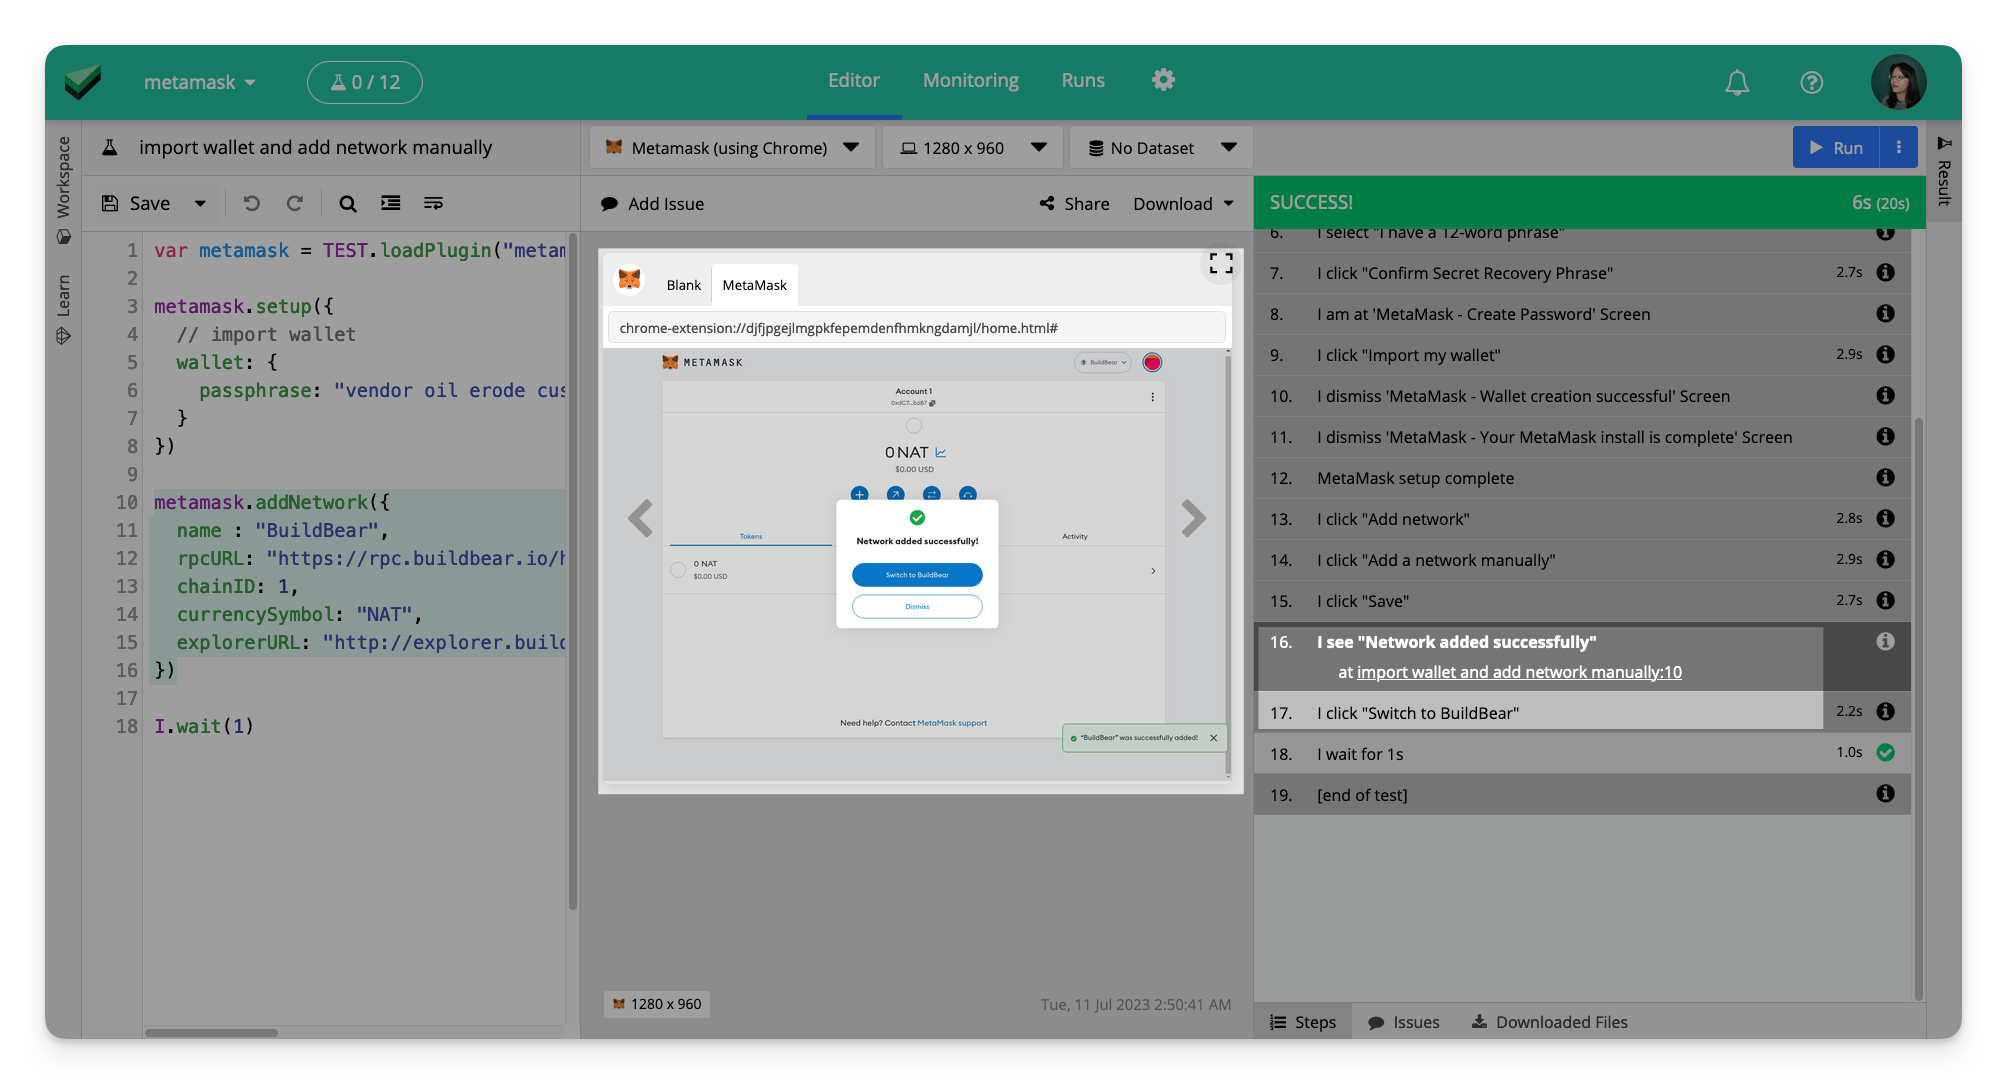
Step 2.5: Switch to the testnet on Metamask
By default, MetaMask uses the Ethereum Mainnet as the blockchain network. We want to switch the network to a testnet like the one we created using BuildBear for emulating transactions.
Use the metamask.addNetwork function to manually add and switch to the private testnet. You can find the details for your private testnet in the BuildBear dashboard.
// switch to our custom private testnet
metamask.addNetwork({
	name : "BuildBear",
	rpcURL: "https://rpc.buildbear.io/example",
	chainID: 1,
	currencySymbol: "NAT",
	explorerURL: "http://explorer.buildbear.io/example"
})
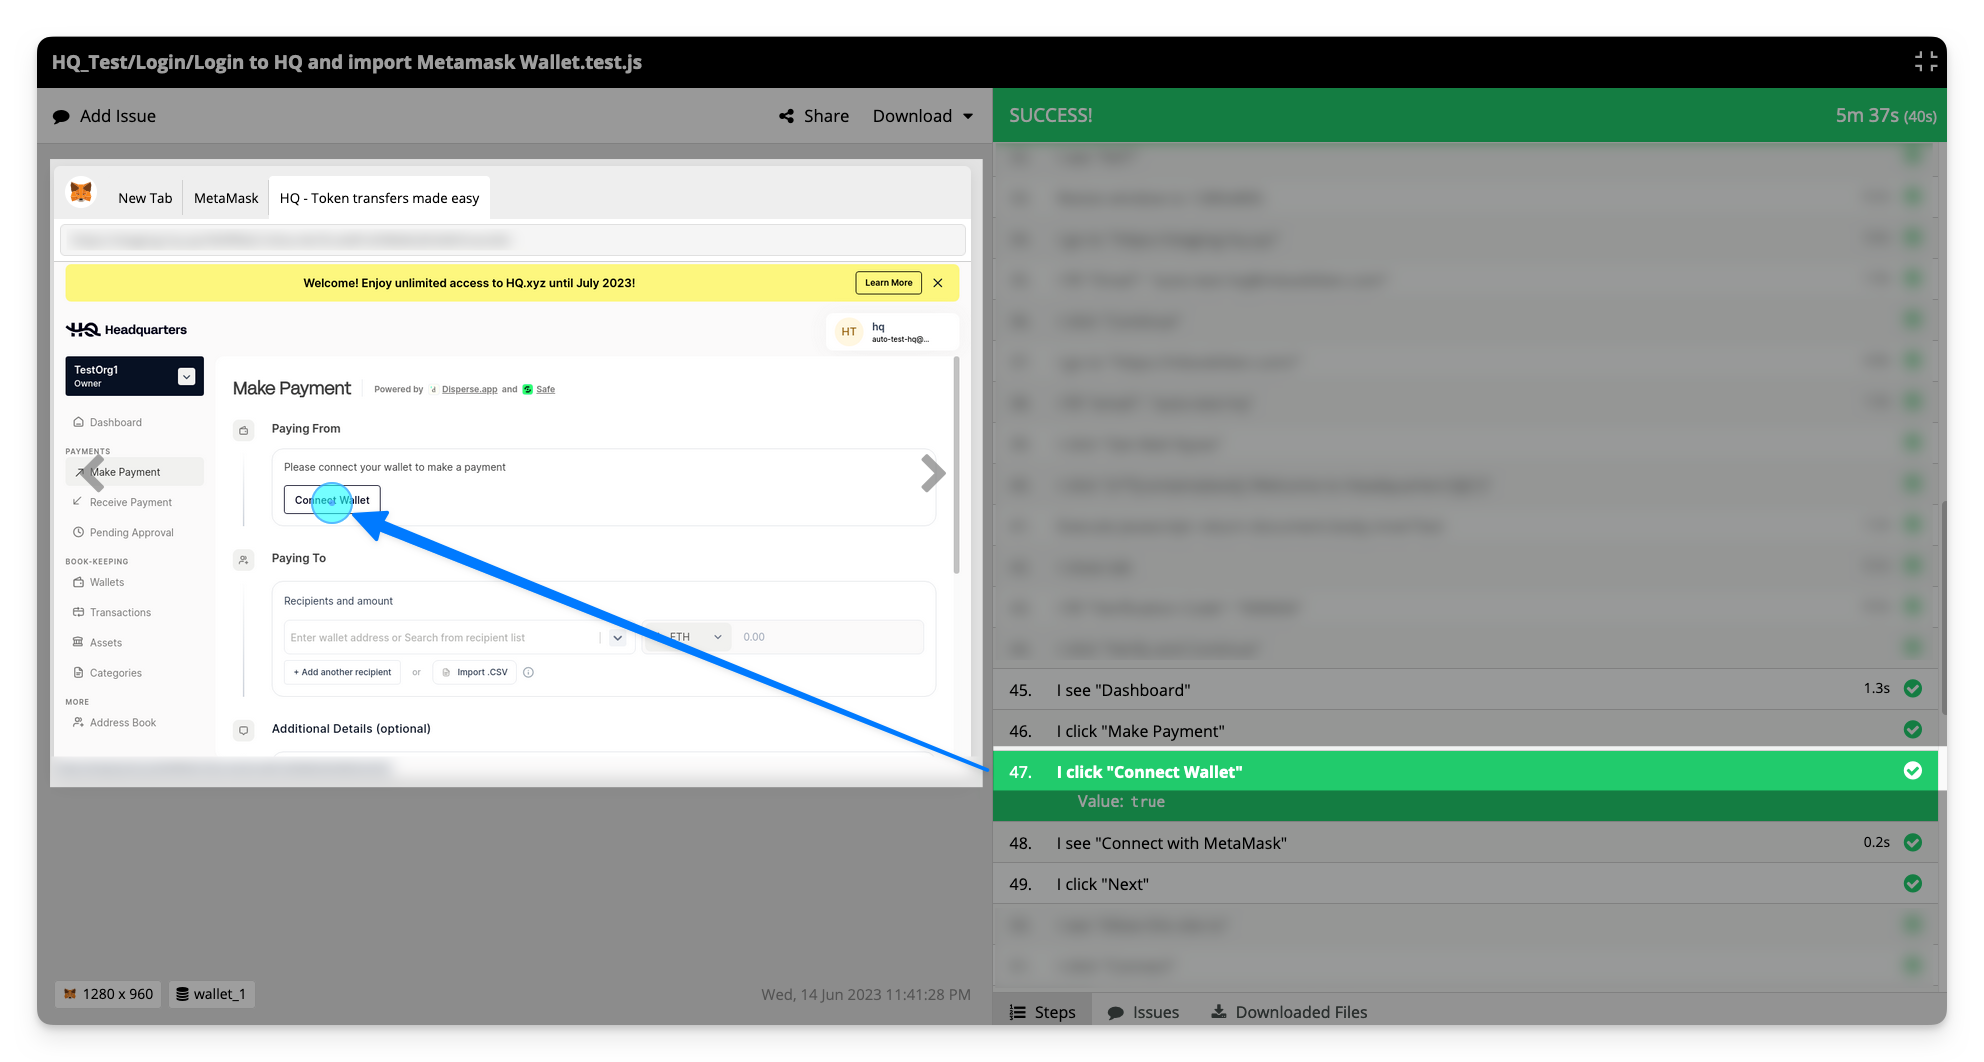
Step 2.6: Connecting the wallet to your Web3 application
After configuring MetaMask to use the testnet, we want to go to the Web3 application and proceed to connect MetaMask to the Web3 application.
For this guide, we’ll are using HeadQuarters, a Web3 bookkeeping and payment SaaS application for demostration. We'll perform a test to check that a user is able to connect the wallet using MetaMask and create a payment using the application.
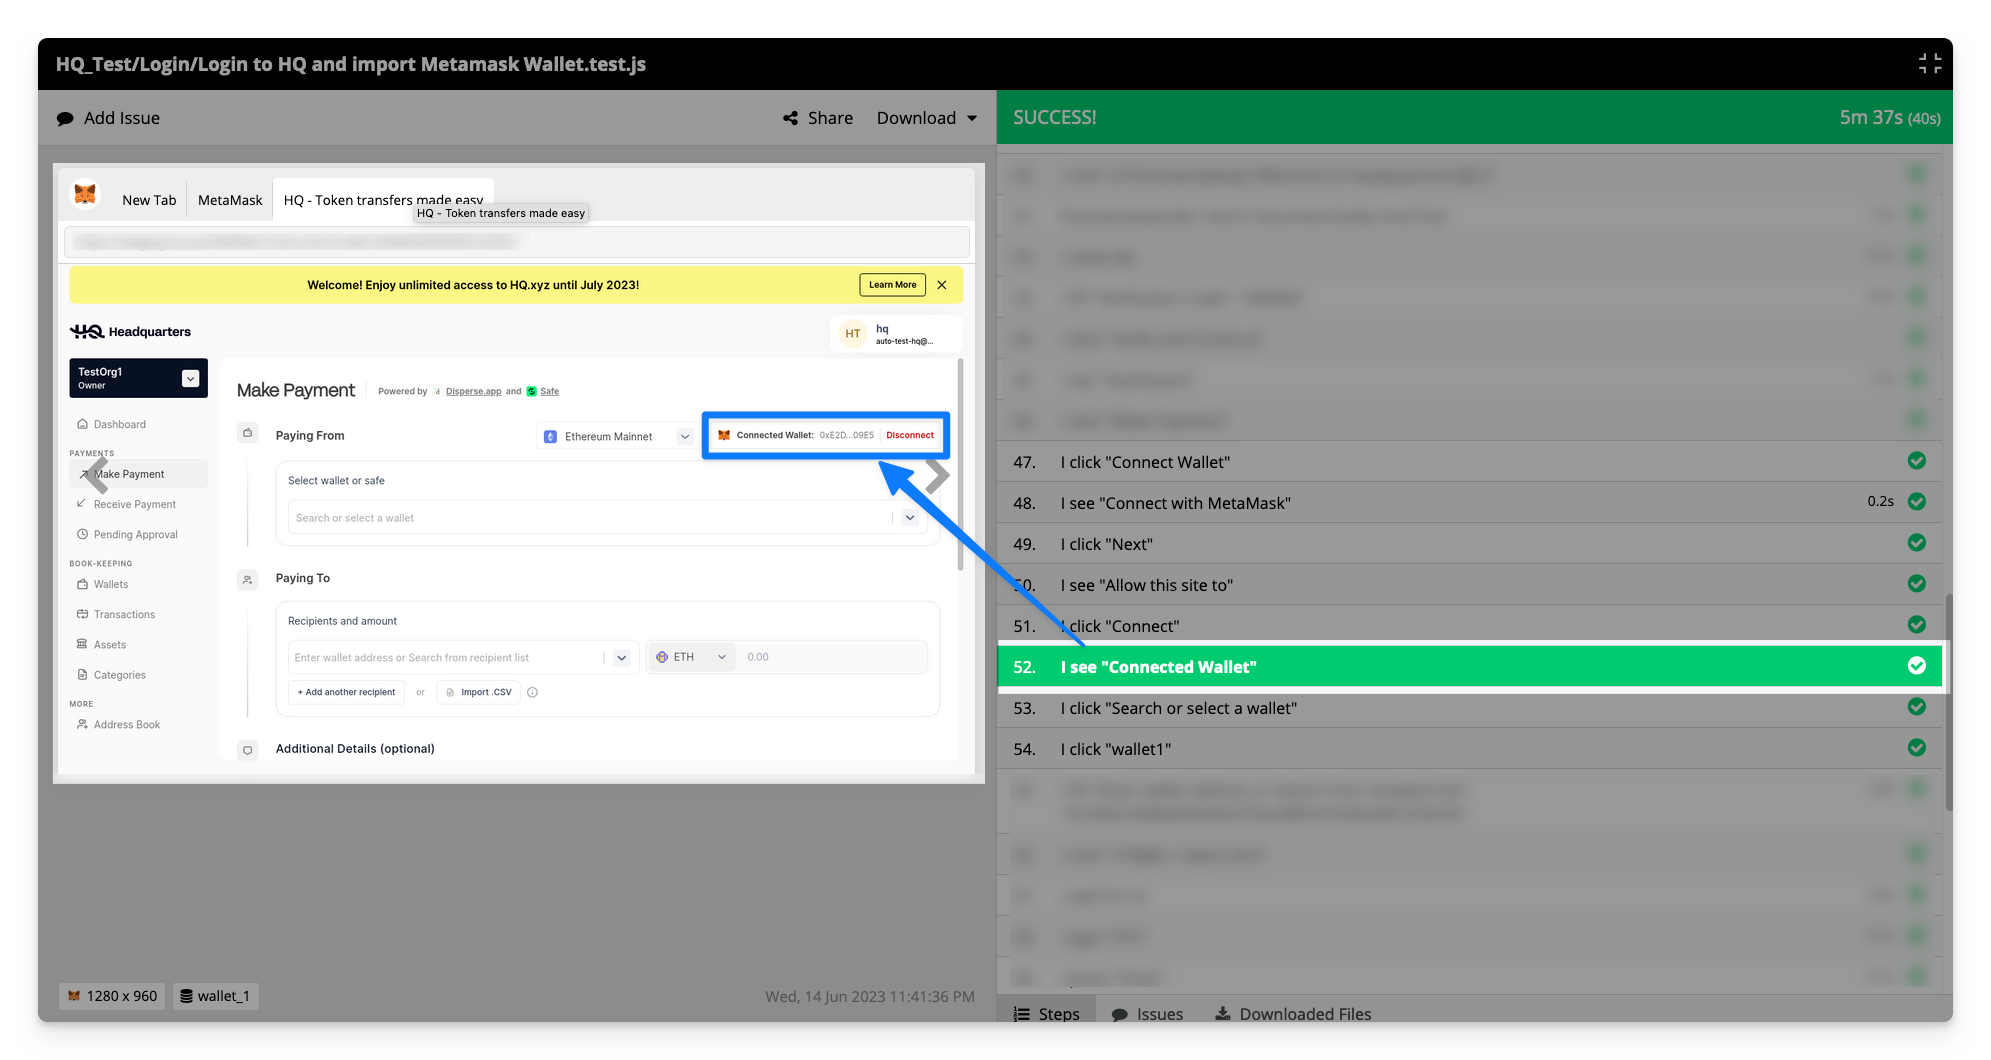
The following code simulates a user logging into the HeadQuarters application, and clicks "Connect Wallet" on the application's dashboard which to prompt MetaMask to authorise the connection.
// after setting up metamask and switching networks

// This is just an sample, and needs to be customized for your application
// Navigate to HQ.xyz and login
I.goTo("https://app.hq.xyz")
I.fill("Email", test_email)
I.click("Continue")
var otp = get_otp_from_email_inbox()
I.fill("Verification Code", otp)
I.click("Verify and Continue")

// Press "Connect Wallet" on the dashboard to open Metamask and authorise connection
I.see("Dashboard")
I.click("Connect Wallet")
When an Web3 application attempts to connect to a wallet, MetaMask will open a pop-up window asking to authorise and accept the connection.
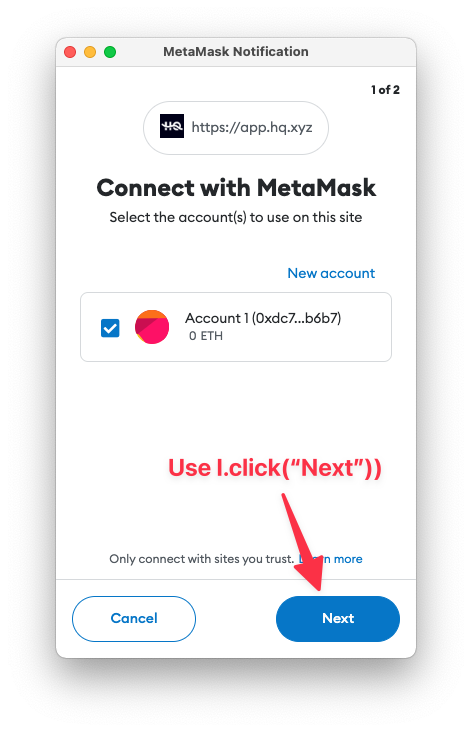
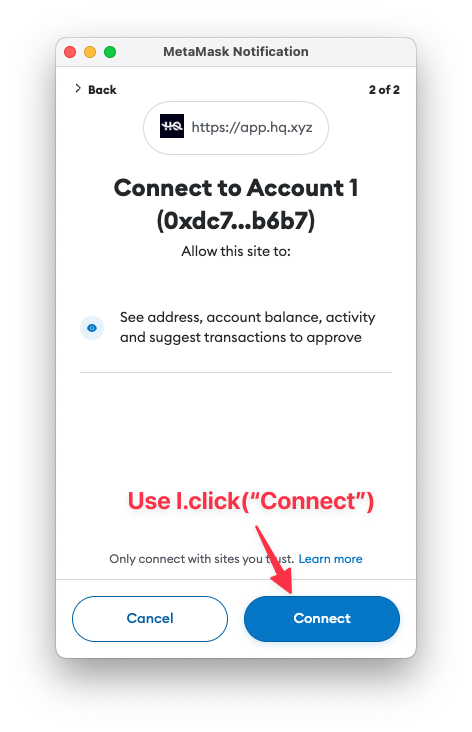
We add the following to the test to click “Next” followed by “Connect” to interact with the Metamask pop-up and authorise the connection.
// Now at the first screen "Connect with Metamask" which lists wallets to connect
I.click("Next")

// Now at the second screen "Allow this site to" which list permissions the site is requesting for
I.click("Connect")
Step 2.7: Testing a transaction
Now that the wallet is successfully connected to our test application, let’s finish this test by testing a transaction.
We add the following test steps to create a payment from one wallet to another in the HeadQuarters application.
// after wallet is connected to the HQ application

// select wallet to make payment from
I.click("Search or select a wallet")
I.click("wallet1")

// enter recipient details
I.fill("Enter wallet address or search from recipient list", recipient_wallet_address)

// enter amount to transfer to recipient wallet
I.select("Symbol", "ETH")
I.fill("recipients.0.amount", "0.005")

// review and submit the transfer
I.click("Review Transfer")
I.click("Submit for approval")
After clicking “Submit for approval”, Metamask will open another pop-up window to ask the user to approve the transaction.
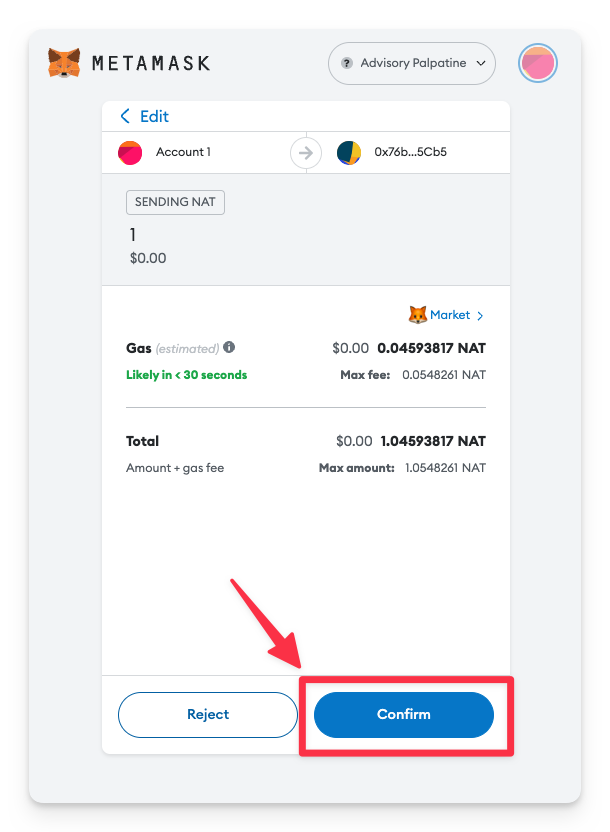
Use the click command to press the confirm button on the Metamask pop-up window.
// Press the confirm button on the Metamask window to Disperse Ether
I.click("Confirm")
With a testnet like BuildBear, this transaction will take just a few seconds to complete.
Finally, we'll add a check to ensure that the application is updated on the transaction status.
// confirm the success message is displayed on the application
I.see("Transfer Successfully Sent")
Now, we'll re-run the completed test and cross our fingers.
Voila! We have successful automated a test that set up the wallet in Metamask, and connects it to the application, and create a transaction on the test net. The test is completed and passed with no errors! We can share the good news with the developers so they can greenlight the new release for deployment to production.
Testing Web3 applications doesn’t have to be slow and painful. With the right test strategy and tools like BuildBear and UIlicious, it can be straightforward to set up automated end-to-end tests that are fast.